> This page is for Designer API.
> For clean Markdown of any page, append .md to the page URL.
> For a complete documentation index, see https://developers.webflow.com/llms.txt.
> For AI client integration (Claude Code, Cursor, etc.), connect to the MCP server at https://developers.webflow.com/_mcp/server.
# Create your first Designer Extension
> A quick guide to help you set up a Designer Extension and start creating Apps that work directly in the designer
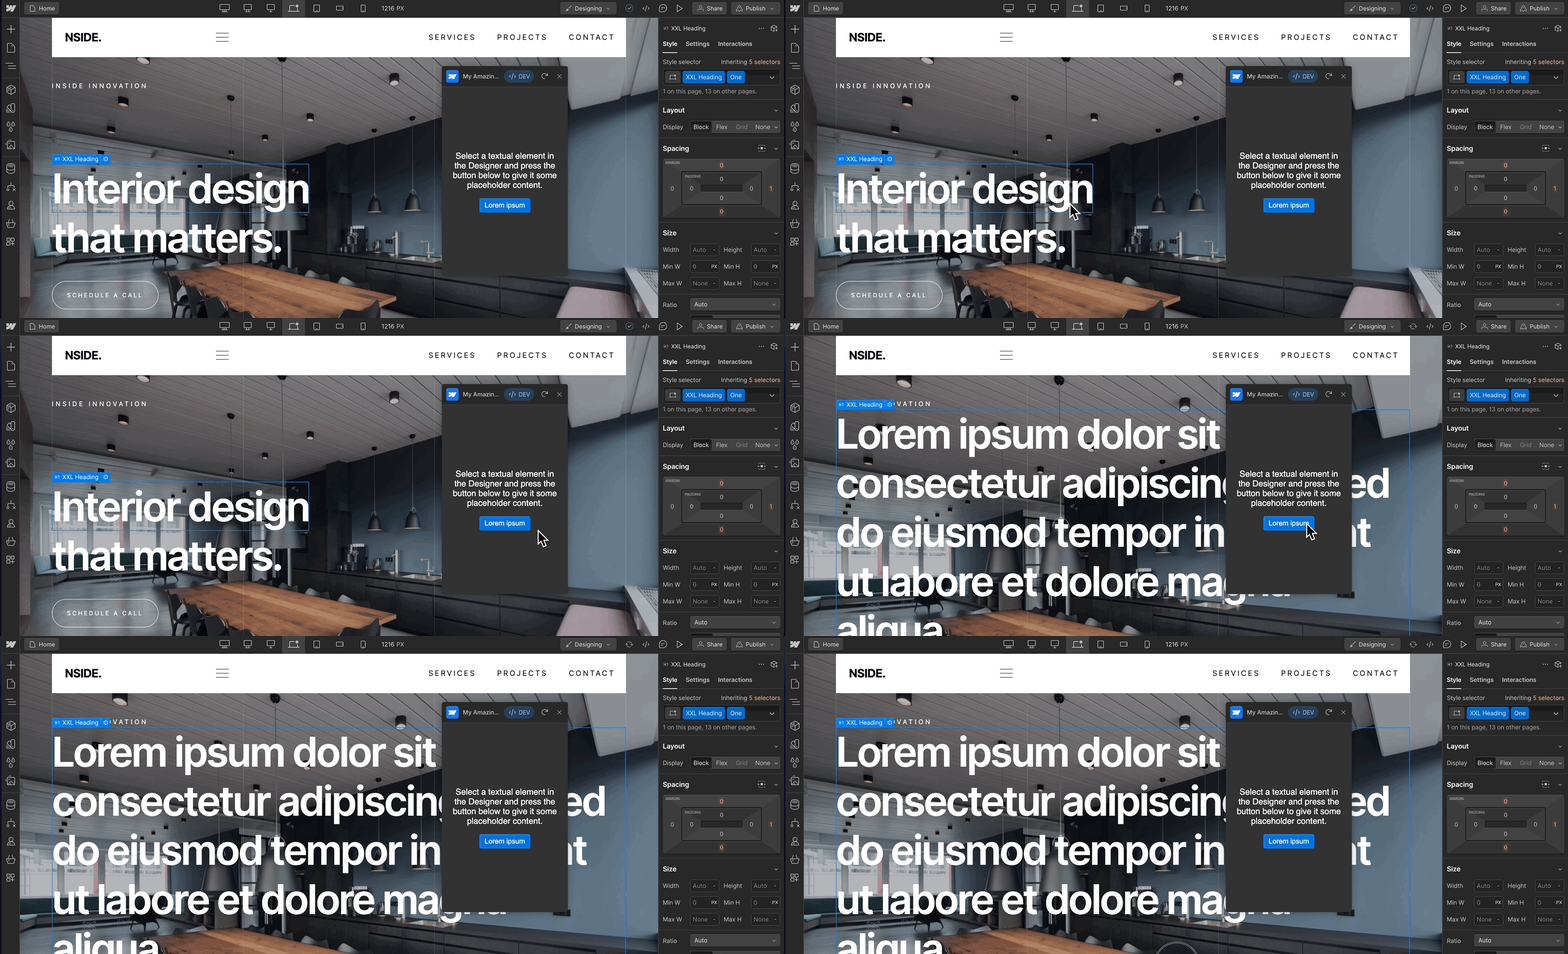
In this tutorial, you'll learn how to create and run a [Designer Extension](/apps/docs/designer-extensions) that updates text on elements within the Designer. This guide is intended for developers who want to build custom functionality directly into the Webflow design environment.
By the end of this tutorial, you will be able to:
* **Install and configure** the [Webflow CLI](/designer/reference/webflow-cli)
* **Scaffold** a new Designer Extension project
* **Run your extension locally** in the Webflow Designer
* **Programmatically update elements** on a page
* **Use the [Designer APIs](/designer/reference/introduction)** to extend your extension’s capabilities
---
### Prerequisites
Before you begin, make sure you have:
* Node.js 16.20 or later
* Access to a Webflow site for development and testing
* A registered Webflow App installed on your test site
If you haven’t set up an app yet, follow the [creating an App guide.](/data/docs/register-an-app)
## Set up your development environment
#### Install the Webflow CLI
Webflow’s CLI lets you create, manage, and locally run Designer Extensions from the command line.
To install the CLI globally, run:
```shell
npm i -g @webflow/webflow-cli
```
#### Create a Designer Extension project
Use the CLI to scaffold a new Designer Extension with the recommended structure and settings. You can also use templates for frameworks like React and TypeScript. After creating your project, you'll need to navigate to the project directory and install the dependencies.
Replace my-extension-name with your desired project name:
```shell
webflow extension init my-extension-name react
cd my-extension-name
npm install
```
#### Review the project structure
Your new project folder will look like this. For a detailed explanation of each file and folder, see [App Structure](/designer/reference/app-structure) and [App Settings](/designer/reference/app-settings).
```
my_example_extension/
├── node_modules/
├── public/ # Contains all the files to serve your designer extension
│ ├── index.html # Required:This file serves as the initial point of entry for your single page app.
│ ├── index.js # This file adds interactivity and dynamic behavior to your web app.
│ └── styles.css # Defines the visual appearance of your App
├── src/ # Contains the source code for your designer extension
│ └── index.ts
├── package-lock.json
├── package.json
├── webflow.json # Contains the settings for your designer extension
├── README.md
└── tsconfig.json # Contains the TypeScript configuration for your designer extension
```
## Run your Designer Extension locally
Before you can test your extension in Webflow, you’ll want to run it locally to enable live development and preview changes as you make them.
#### Start the development server
Navigate to your project directory and run the following command to start the development server:
```shell
npm run dev
```
This command serves your Designer Extension on port 1337 using the CLI’s `webflow extension serve` command and runs webpack in watch mode with `npm run watch-webpack` concurrently. This setup enables live updates as you develop.
> **Note**
>
> While you can load your extension in a browser at `http://localhost:1337`, your app will only be able to interact with the Designer fully when loaded within the Webflow Designer.
#### Install your extension to your test site
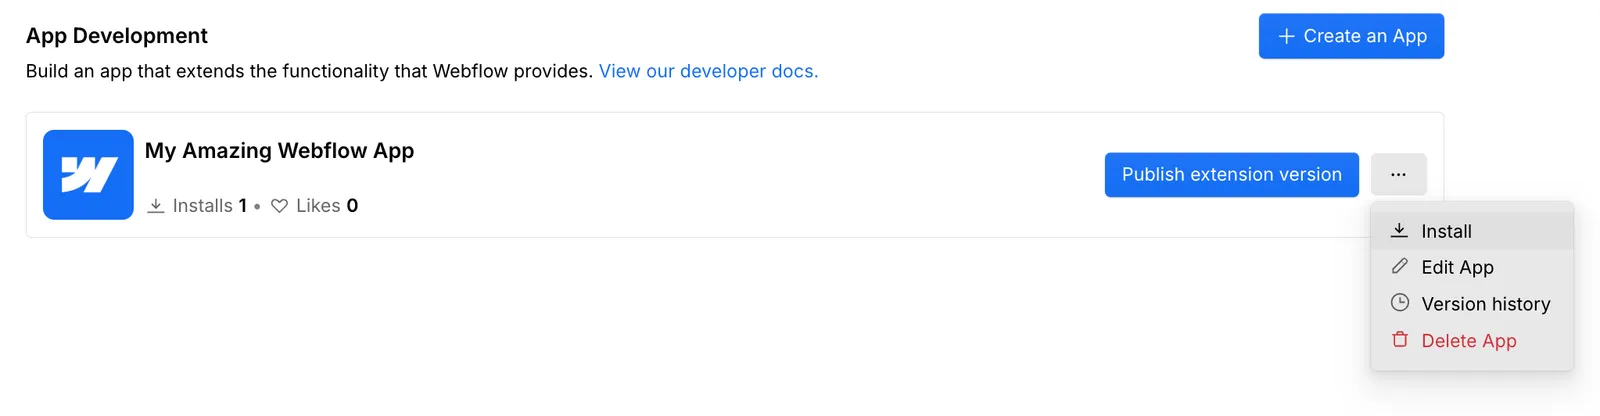
In your Workspace Settings, navigate to the "Apps & Integrations" > "Develop" section. Find your App and select the "..." button. Click "Install" and follow the instructions to install your extension to your test site.
#### Open App the Webflow Designer
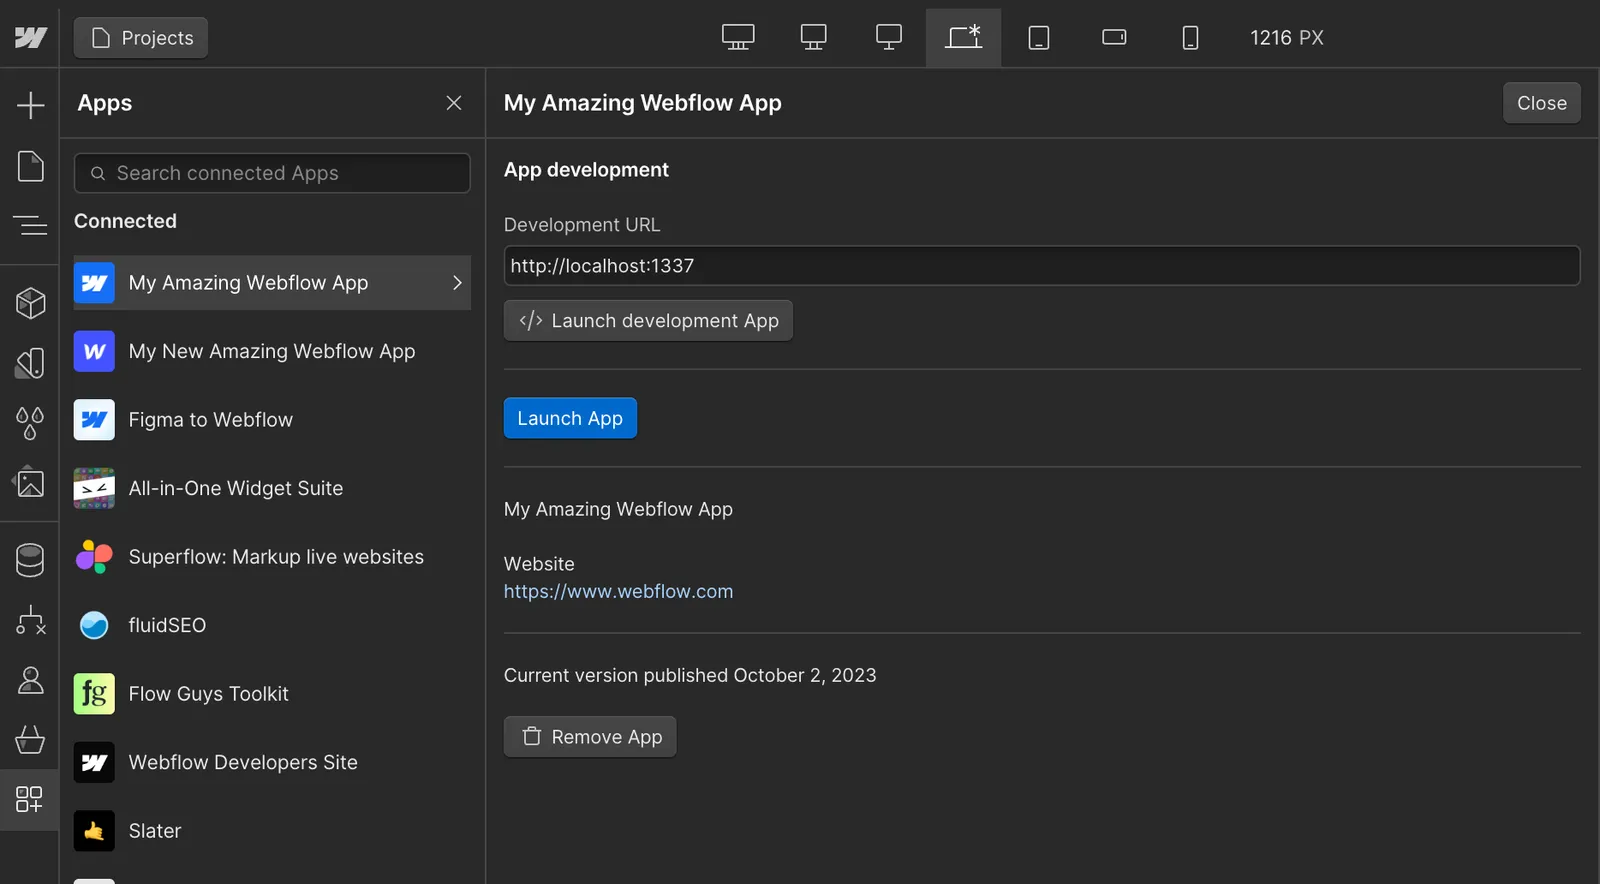
Open your test site in the Webflow Designer, and press the "E" key to open the app panel. Find your app and click "Launch development app" to see your extension running in the Webflow Designer.
> **Note**
>
> If you don't see your extension in the apps panel, you may need to refresh the page.
## Modify elements with the Designer APIs
The starter project you created already includes a basic example of using the Designer APIs: when you select a text element in the Webflow Designer and click the "Lorem Ipsum" button in your extension, the selected element’s text is replaced with placeholder content.
However, if you select a non-text element, the extension will not be able to update the text content. **Let’s improve this experience by adding user feedback for error cases.**
#### Understand the starter functionality
Your extension’s UI includes a "Lorem Ipsum" button. When clicked, the extension:
* [Gets the currently selected element](/designer/reference/get-selected-element) in the Designer
* [Replaces the text](/designer/reference/set-text-content) of the selected element with placeholder text
This code is found in `src/index.ts`.
**`src/index.ts`**
```ts title="src/index.ts" {3-7}
document.getElementById("lorem").onsubmit = async (event) => {
event.preventDefault();
const el = await webflow.getSelectedElement();
if (el && el.textContent) {
el.setTextContent(
"Lorem ipsum dolor sit amet, consectetur adipiscing elit, sed do eiusmod tempor incididunt ut labore et dolore magna aliqua."
);
}
};
```
#### Improve the user experience with notifications
Currently, if no element is selected or the selected element doesn’t support text, nothing happens. Let’s add a notification to guide the user in these cases. To do this, we'll add an `else` clause to the `if` statement in `index.ts` and use the [`webflow.notify()`](/designer/reference/notify-user) method to notify a user that they should choose a supported element.
Update your code as follows:
**`index.ts`**
```ts title="index.ts" {16-18}
document.getElementById("lorem").onsubmit = async (event) => {
// Prevent the default form submission behavior, which would reload the page
event.preventDefault()
// Get the currently selected element in the Designer
const el = await webflow.getSelectedElement()
// Check if an element was returned, and the element can contain text content
if (el && el.textContent) {
// If we found the element and it has the ability to update the text content,
// replace it with some placeholder text
el.setTextContent(
"Lorem ipsum dolor sit amet, consectetur adipiscing elit, sed do " +
"eiusmod tempor incididunt ut labore et dolore magna aliqua."
)
} else { // If an element isn't selected, or an element doesn't have text content, notify the user
await webflow.notify({ type: 'Error', message: "Please select an element that contains text." })
}
}
```
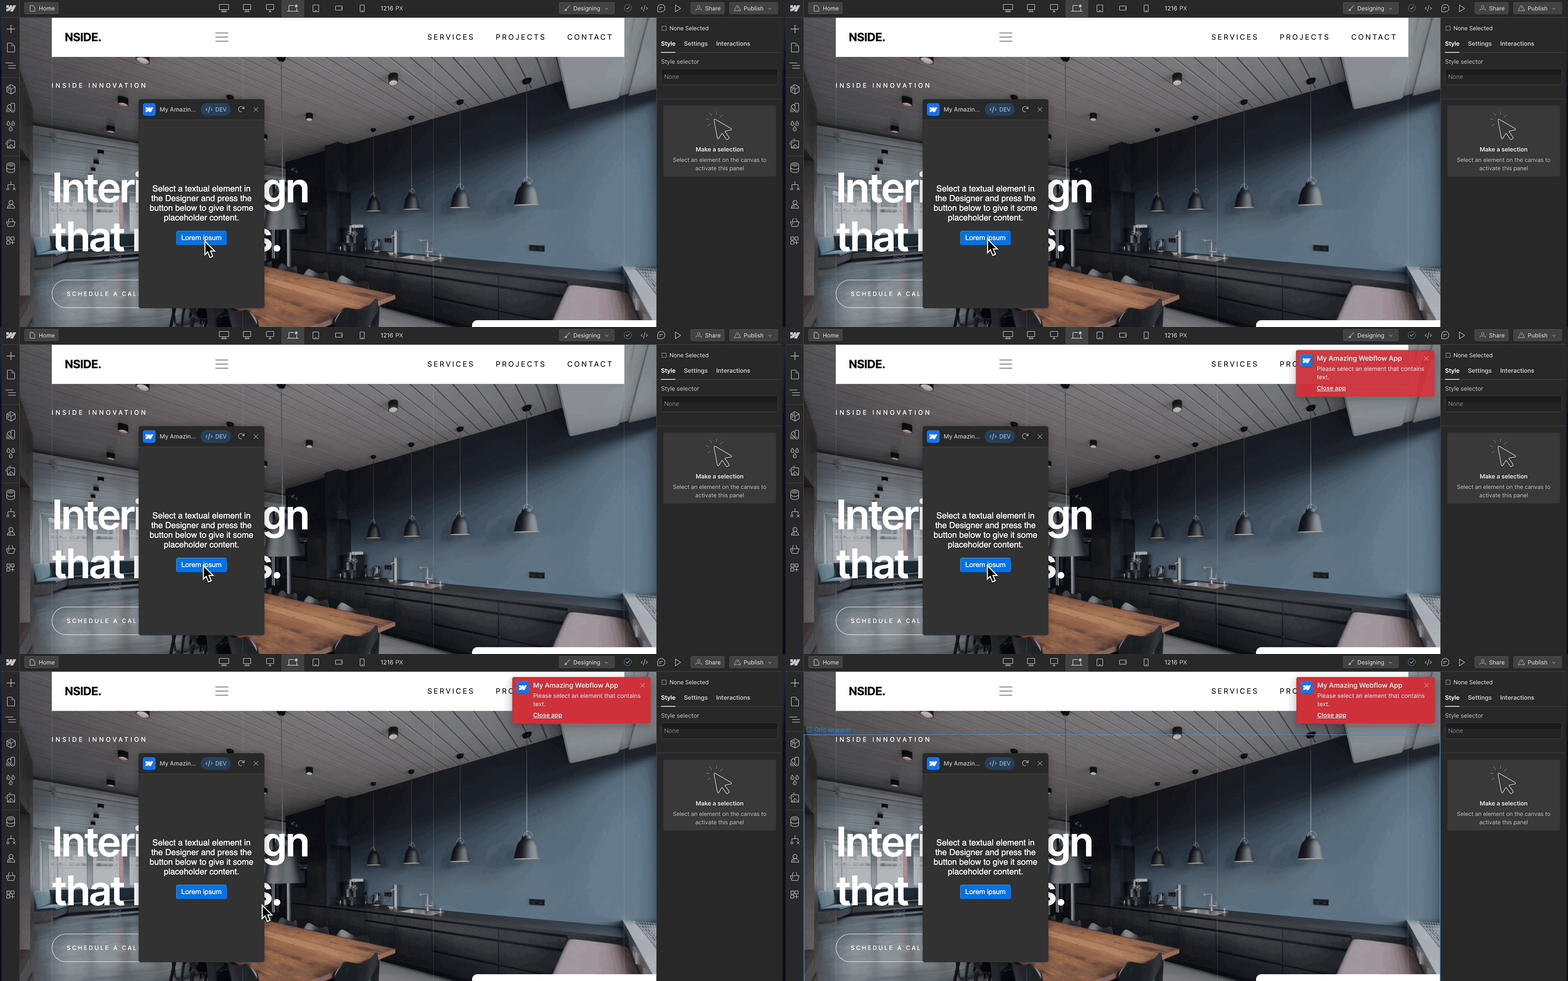
Now, if the user clicks the button without selecting a valid text element, they’ll see a clear error notification in the Designer.
#### Test your extension
Refresh your extension by clicking the
icon in the top right of your Designer Extension.
* Select a text element and click the button: the text should update.
* Select a non-text element (like an image) and click the button: you should see an error notification.
If both behaviors work as described, you’ve successfully improved your extension.
### Next steps
Congratulations! You’ve built and run your first Designer Extension.
To continue your journey and unlock more advanced capabilities, explore the following resources:
* **Learn more about the [Designer APIs](/designer/reference/introduction)**\
Dive deeper into what’s possible with the [Designer API reference.](/designer/reference/introduction)
* **Build and publish your extension**\
Follow our guide on [building and deploying](/apps/docs/publishing-your-app) Designer Extensions to prepare your app for the [Marketplace](https://webflow.com/marketplace).
* **Submit your App to the Webflow Marketplace**\
Share your extension with the community by [submitting your app.](https://developers.webflow.com/submit)
* **Troubleshoot and get help**\
Visit our [developer community](https://community.webflow.com/developers-space) for support, tips, and to connect with other Webflow extension developers.