App Intents and Connections
Make your Apps more discoverable in the Designer with App Intents and Connections.
Use App Intents and Connections to give users more opportunities to find and launch your App in the designer. These features display links to your App in contextual locations like the ‘Element Settings’ panel, creating smoother and more relevant interactions when users are creating and editing elements on their sites.
App Intents
App Connections
App Intents make your App discoverable when users create or modify elements. By adding an Intent to your App’s webflow.json file, users will be prompted to use your App for managing element settings directly within their existing workflow. Adding an intent allows your App to stand out as a relevant tool in the Designer.

Supported Elements
App Intents and connections currently supports the following elements:
Image, FormForm, and FormWrapper.
How App Intents and Connections work
App Intents
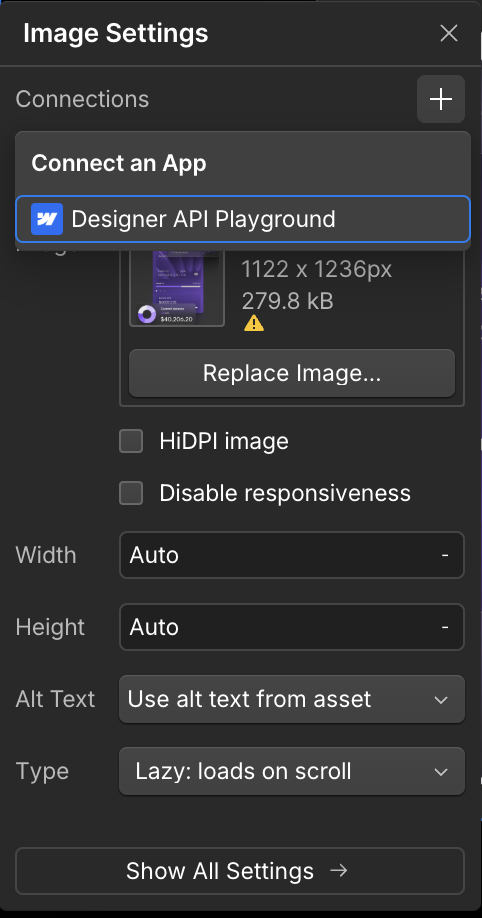
When your App is configured to use App Intents for a supported element, your App will appear in the “Connections” section in an element’s settings panel.
If a user has already installed your App to their site, but aren’t already using connections to manage their elements, they’ll see a “Connections” section in the element settings panel. If they click the ”+” button in this section, they’ll see your App listed in the “Connect an App” section.


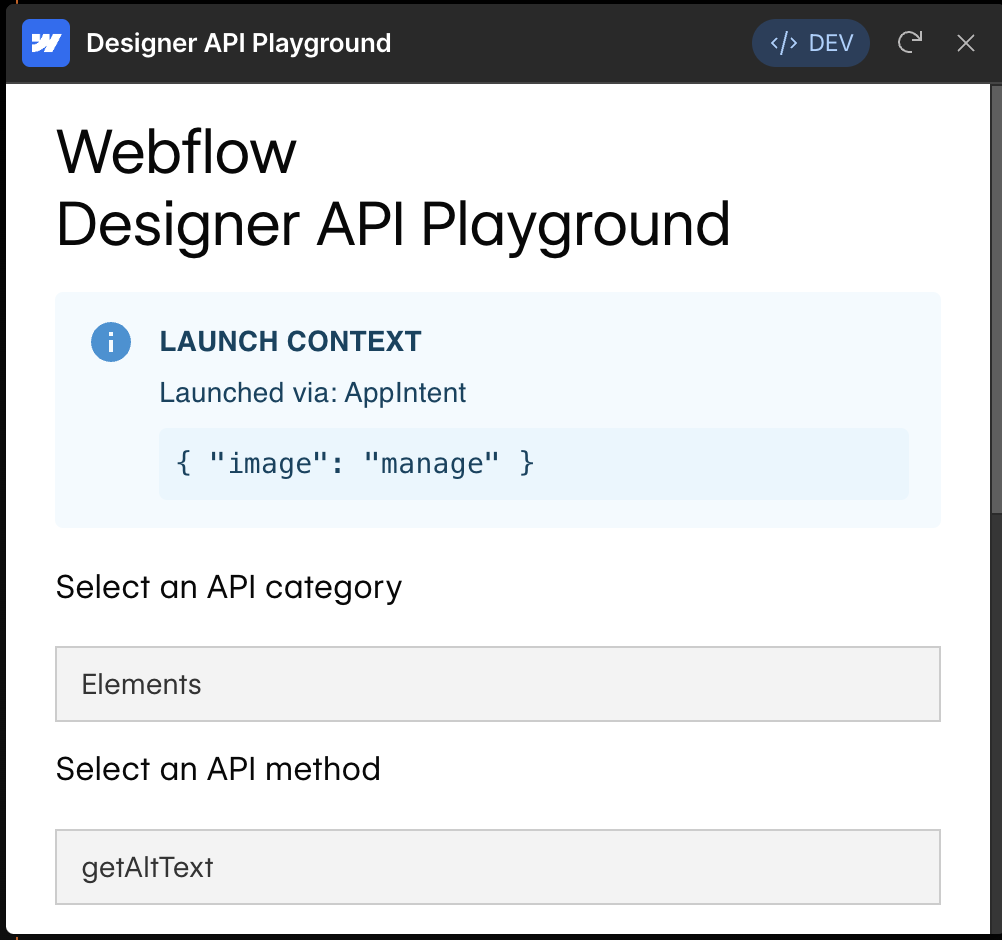
When your App launches from the element settings panel, your App will receive important context about the element that triggered the launch, which you can access using the getLaunchContext() method.
Use this context to show the most relevant interface for a user’s workflow.

We've configured the API Playground to use App Intents for the Image element. When the API Playground is launched from the Element Settings Panel, the App will show the launch context in an info box and preselect the API Category to 'Elements' and the API Method to getAltText() ,
App Connections
App Connections establish links between supported elements and your App. Using the element.setAppConnection() method, you can create a direct connection that prompts users to manage that element’s settings through your App. For example, you can connect an image element to your App so users choose to manage assets and alt text in your App rather than managing the settings themselves.

When your App creates a connection with an element:
- Webflow adds a button in the element’s settings panel to launch your App
- Webflow opens your App with context about the specific element
Your App knows exactly which element launched it and can instantly show the most relevant interface for a user’s workflow. Instead of dropping users at your App’s home screen, you can welcome them with the tools and settings they need for that specific element; creating a personalized entrance for every connected element.

Try App Connections on Your Site
Explore App Connections firsthand. Download and run our example App on your site to see how it integrates directly into your workflow.
Setting up App Intents and Connections
In the steps below, we’ll walk through the following:
1. Configuring your App
With the addition of App Intents and Connections, your webflow.json can now use two additional properties: appIntents and appConnections.
Adding App Intents
In webflow.json, add a new property called appIntents. Create an object with a key for each element type you’d like to support. Each key should have a value of an array of strings, where each string is a unique identifier for an App Intent.
As we improve support for more elements and intents, you’ll be able to add them to your App Intents list.
Once this is added to your webflow.json, your App will appear in the “Connections” section of the supported elements’ settings panels.
Adding App Connections
In webflow.json, add a new property called appConnections. Set it to an array of strings, where each string is a unique identifier for an App Connection.
2. Listening for Launch Context from an App Intent
When your App launches from the element settings panel, Webflow will send information about how your App was launched back to your App. To get this information, you’ll need to listen for launch context from the Webflow Designer by calling the getLaunchContext() method.
When your App is launched from an App Intent, getLaunchContext() returns an object with the following structure:
It’s most appropriate to call getLaunchContext() on the main page of your App, such as the entry point of a React App.
3. Create an App Connection
Now that you’ve retrieved the launch context, you can access the details of the element that launched your App. From there, you can create an App Connection to the element so that users are prompted to use your App each time they open that element’s settings panel.
Since an element will always be selected in the Designer when accessing its settings, you can simply call the getSelectedElement() method to get the element that launched your App. Then you can create an App Connection to the element using the identifier you configured in webflow.json.
4. Listening for Launch Context from an App Connection
As with App Intents, when your App is launched from an App Connection, Webflow will send information about how your App was launched back to your App. To get this information, you’ll need to listen for launch context from the Webflow Designer by calling the getLaunchContext() method.
When launched from an App Connection, the LaunchContext object will have the following structure:
Let’s reconfigure our App to listen for launch context from either an App Intent or App Connection.
5. Listing App Connections
If your App manages multiple resources, you may want to organize and list them in your App for users to reference. You can retrieve a list of all App Connections for a given element using the getAppConnections() method on an individual element.
To do this, let’s get a list of all elements on the page and then retrieve the App Connections for each element.