Add a Key Value Store to your app
What you’ll learn:
- How to add a Key Value Store to your Webflow Cloud app
- How to use a Key Value Store as a caching layer for third-party API data
- How to improve performance and reduce external requests
Prerequisites
Before you begin, make sure you have:
- A Webflow Cloud app linked to a GitHub repository
- A Webflow Cloud environment set up
- Node.js 22 or later and
npminstalled - Basic familiarity with JavaScript/TypeScript
New to Webflow Cloud?
If you haven’t already, follow the Quick Start guide to set up your app and environment.
Add a Key Value Store binding
Before you can use a Key Value Store in your Webflow Cloud app, you need to declare a binding in your app’s configuration. This binding tells your app how to connect to the storage resource.
Once the binding is declared, your app can use simple methods like .get(), .put(), and .delete() to read from and write to the Key Value Store directly in your code.
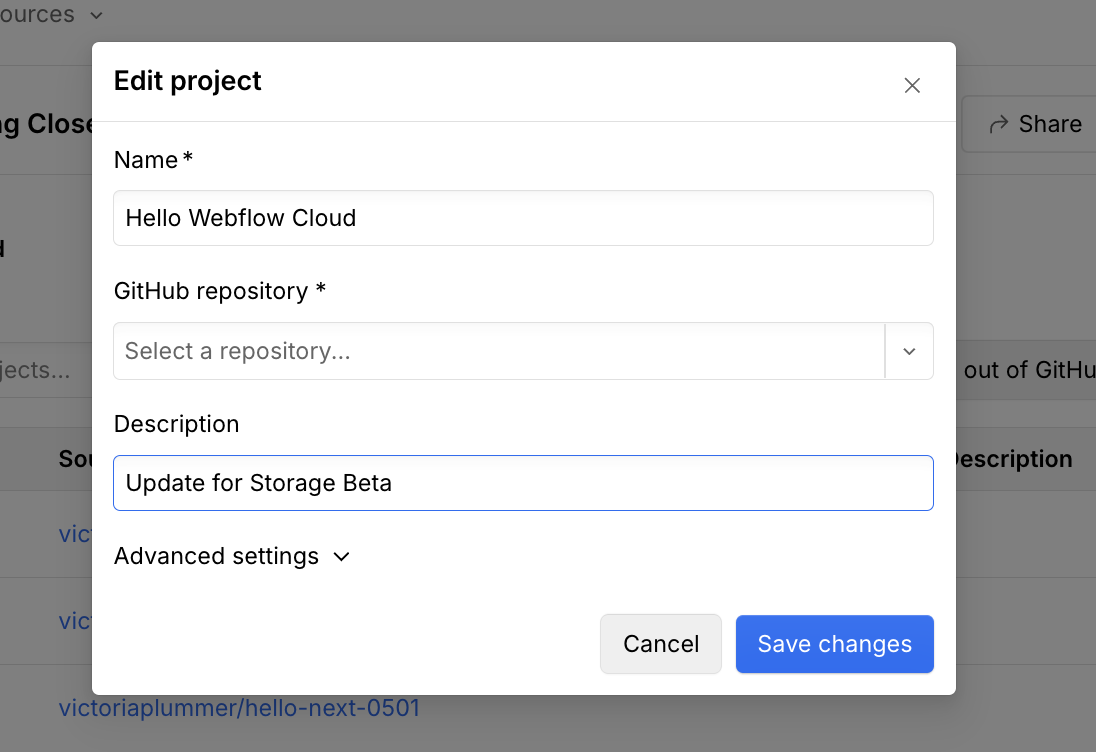
Update your app in Webflow Cloud (Optional)
If you created a Webflow Cloud prior to 7/16/2025, you’ll need to update your app in the Webflow Cloud dashboard to use Webflow Cloud’s new storage system.
-
Go to your app in the Webflow Cloud dashboard.
-
Select the ”…” icon in the “Actions” section of the menu.
-
Select “Edit” (you don’t actually need to edit anything).
-
Press “Save Changes” to update your app.
Declare the Key Value Store binding.
In your app’s wrangler.json file, add a kv_namespaces array to define your Key Value Store binding:
binding: The variable name you’ll use to access the database in your code. This must be a valid JavaScript variable name.id: A unique identifier for your database (Webflow Cloud will generate this for you once you deploy your app).
Get weather data
Now that your Key Value Store binding is set up, you can use it to cache data in your app. In this section, you’ll build an API route that fetches weather information based on the user’s location. Each response will be stored in your Key Value Store for 10 minutes, so repeated requests are fast and reduce calls to the external weather API.
Create a new API route
Set up an API endpoint that will fetch weather data for your users.
Astro
Next.js
-
In your Astro app, go to the
src/pages/apidirectory. If this directory doesn’t exist, create it. -
Inside this directory, create a new file called
weather.ts. -
Add the following code into your new file:
Get the Key Value Store binding
Access your Key Value Store binding in your API route so you can read from and write to the store.
Astro
Next.js
In your weather.ts file, access the binding from the runtime environment:
env.WEATHER_CACHEgives you access to the Key Value Store you declared inwrangler.json.
Get user's location
Extract the user’s location from the request headers. This information will be used to fetch location-specific weather data.
Astro
Next.js
In your weather.ts file, add the following code to get the user’s latitude and longitude from the Cloudflare request headers:
request.cfcontains the user’s location information.- If the headers are missing, return a 400 error.
Check for cached data
Before making an external API call, check if the weather data for the user’s location is already stored in your Key Value Store. If cached data exists, return it immediately to improve performance and reduce external requests.
Use the .get() method on the binding to check for cached data.
Astro
Next.js
In your weather.ts file, add the following logic after retrieving the user’s location:
- This creates a unique cache key for each location.
- If data is found, return it with a
X-Cache-Status: HITheader. - If not, continue to the next step to fetch and cache new data.
Fetch and cache fresh weather data
If no cached weather data is found, fetch fresh data from the Open-Meteo API, store it in your Key Value Store, and return it to the user.
Store the fresh data in your Key Value Store using the .put() method.
Astro
Next.js
In your weather.ts file, add the following logic after checking for cached data:
- Fetches weather data for the user’s location.
- Stores the result in your Key Value Store for 10 minutes.
- Returns the data with a
X-Cache-Status: MISSheader. - If error, return error message.
Test your weather API endpoint
Make sure your API route works as expected by sending a request from your terminal.
-
In your terminal, start your dev server using Cloudflare’s context.
-
In a new terminal, run:
<YOUR_PORT_NUMBER>is the port number of your dev server.<YOUR_BASE_PATH>is the base path of your app.
-
Check the response headers:
- The first request should include
X-Cache-Status: MISS(data fetched from the API and cached). - Subsequent requests should include
X-Cache-Status: HIT(data returned from the cache).
If you see the expected headers and weather data in the response, your endpoint and caching are working!
- The first request should include
Update your home page
Now that your API is returning weather data, let’s display it directly on your home page. In this section, you’ll add a weather widget that shows the current temperature and a matching weather icon for your user’s location. This gives users instant, dynamic feedback and demonstrates how to connect your frontend to your new API.
Add weather icons to your app
Add weather icons to your app so you can visually represent the current weather.
- Run this command in your app’s root directory.
- The
weather-iconspackage provides a set of CSS classes for common weather conditions
Map weather codes to icon classes
Create a utility to translate weather codes from your API into icon classes for display.
- In your app’s
srcdirectory, create autilsfolder if it doesn’t already exist. - Inside
utils, create a file namediconMap.ts. - Copy and paste the following code into
iconMap.ts:
Call the weather API from your home page
Fetch the latest weather data from your API and display it on your home page, along with the appropriate weather icon.
Astro
Next.js
-
Open your home page file. (for example,
src/pages/index.astro) -
Import the weather icons CSS and your icon map utility at the top of the file.
src/pages/index.astro -
Fetch the weather data from your API and extract the temperature and weather code. Then, use the weather code to get the appropriate icon class from your icon map utility.
src/pages/index.astro -
Display the weather data and icon in your page’s markup, below the welcome message:
src/pages/index.astro
See the full code example below:
Test and deploy your app
Make sure your app is working as expected by running it locally and verifying the weather widget displays correctly.
Open your app in the browser
Visit your app in a web browser.
-
Go to
http://<YOUR_PORT_NUMBER>/<YOUR_BASE_PATH>to see your app running locally.<YOUR_PORT_NUMBER>is the port number of your dev server.<YOUR_BASE_PATH>is the base path of your app.
You should see your app running locally with the weather widget displaying the current temperature and weather icon.

Deploy your app
Deploy your app to Webflow Cloud. You can deploy your app in two ways:
-
Use the Webflow CLI
-
Commit and push your changes to your GitHub repository.
Go to your environment in Webflow Cloud to see your app deployed. Once deployed, you can access your app at https://<YOUR_DOMAIN>/<YOUR_BASE_PATH>.
Next steps
Congratulations! You’ve successfully added a Key Value Store to your Webflow Cloud app, built a weather API with caching, and displayed live weather data on your home page.