Add Object Storage to an app
This guide shows you how to add Object Storage to an app and use it to store and serve files. You’ll learn how to:
- Set up an Object Storage binding
- List and display files from your bucket
- Upload files to your bucket with proper validation
- Handle large file uploads using multipart uploads
Prerequisites
Before you begin, make sure you have:
- A GitHub account
- A code editor like Cursor or VS Code
- Node.js 22 or later and
npminstalled - Basic familiarity with JavaScript/TypeScript
Set up the app
This tutorial uses a repository with pre-built UI, backend endpoints, and helper utilities for file uploads and management. Follow along with the steps below and reference the code in the example app to see how Object Storage is used in this Webflow Cloud app. You may need to make some code changes to the app to get it working with your Webflow Cloud environment.
Fork and clone the example repository
To start, fork the repository on GitHub so you have your own copy to work with.
Next, clone your fork of the starter repository to your local machine and install dependencies:
The app uses Astro with TypeScript and includes all necessary dependencies for Object Storage operations.
Create a Webflow Cloud app
Follow these steps to import the application as an independent Webflow Cloud app:
-
In the Webflow dashboard, click New Project > App or click this link: https://webflow.com/dashboard/cloud/deploy.
-
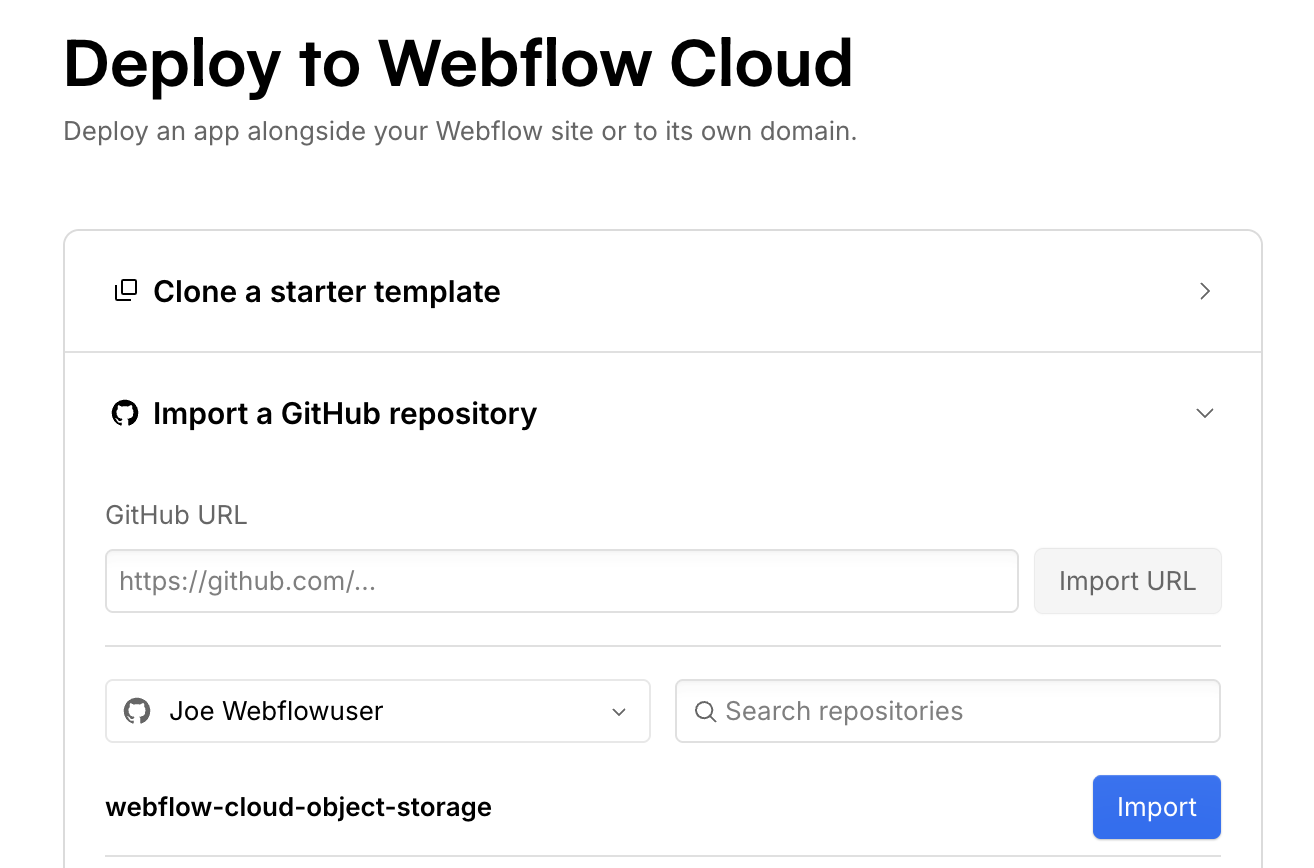
On the Deploy to Webflow Cloud page, click Connect GitHub, then click Import a GitHub repository and select the repository that you forked in the previous section. You can provide the URL to the repository and then click Import URL or select your GitHub account to search for a repository and then click Import.
-
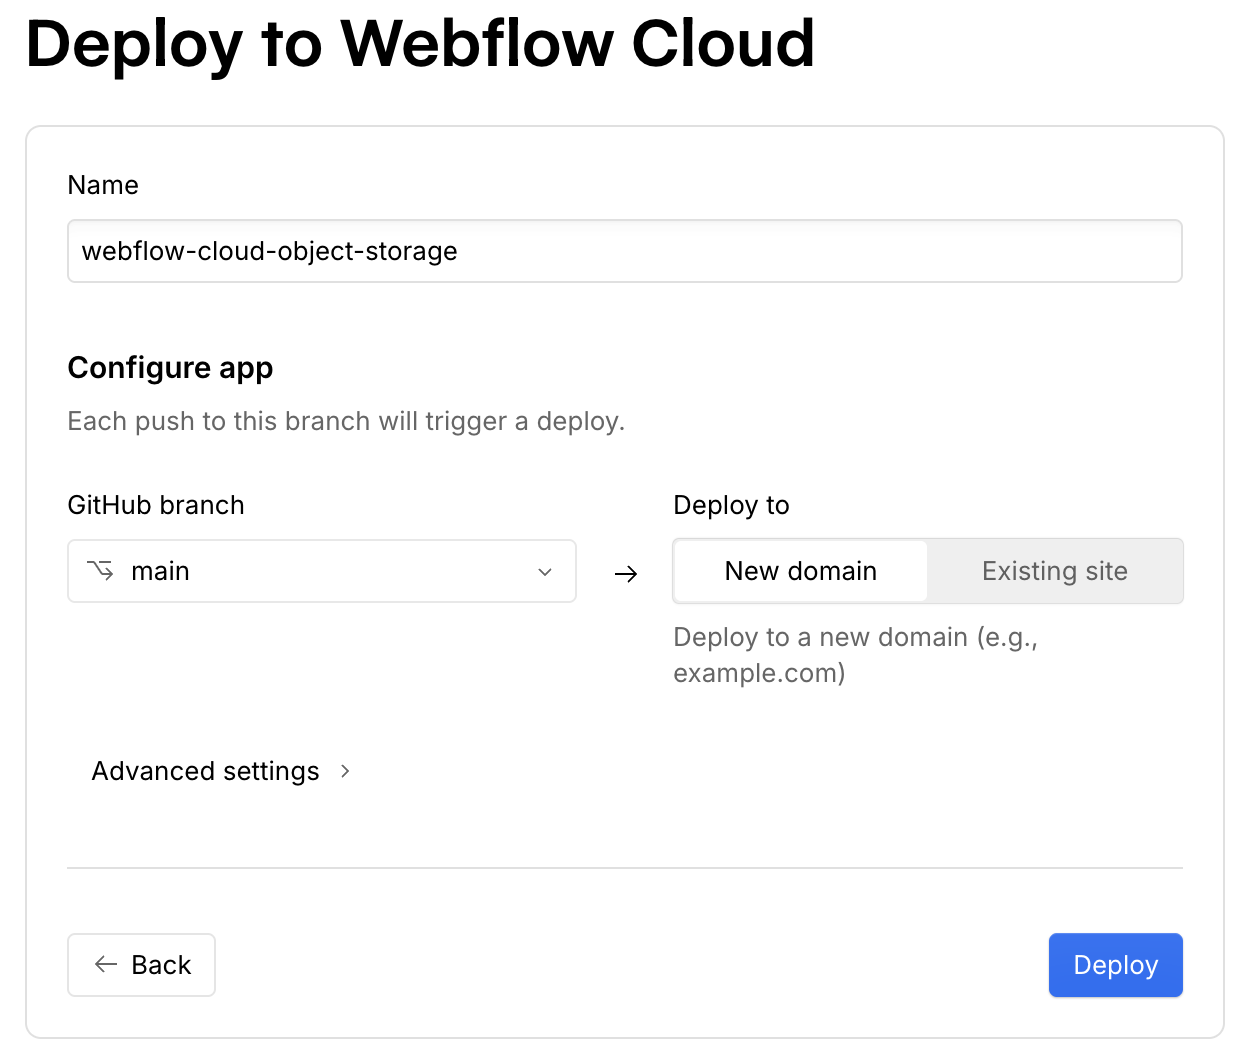
Give the Webflow Cloud app a name, select the branch of the repository to deploy, and under Deploy to, click New domain.
-
Click Deploy and wait for Webflow Cloud to deploy the application.
Now the application deploys automatically when you push changes to the GitHub repository:
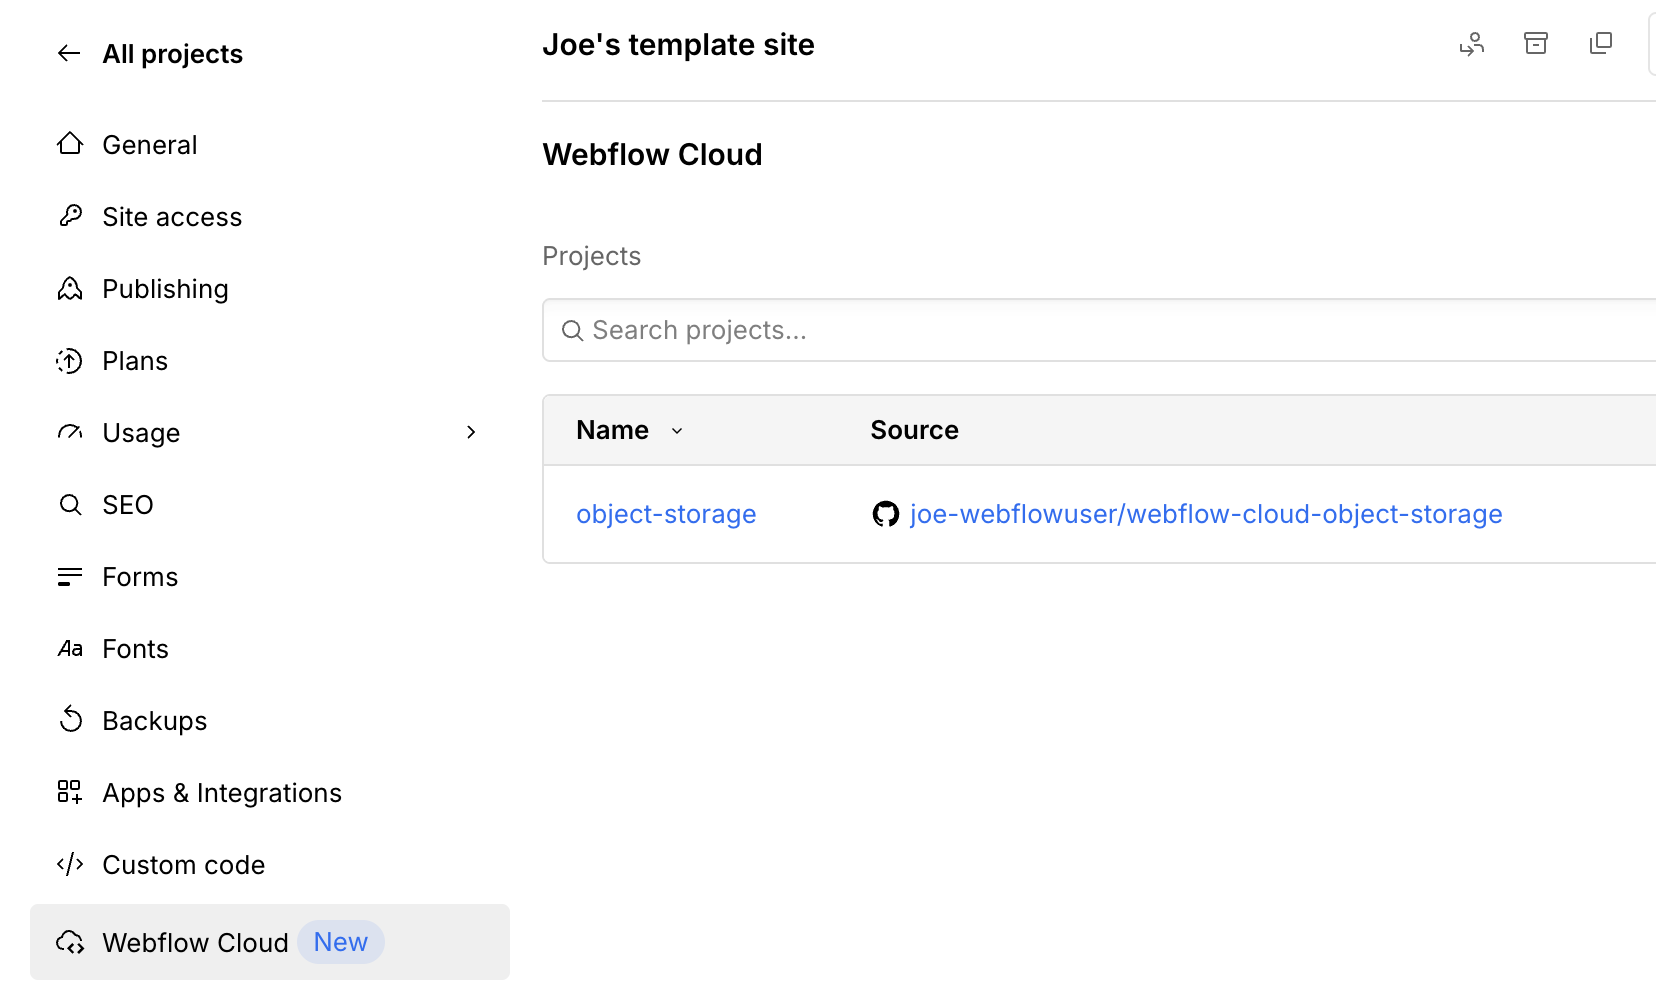
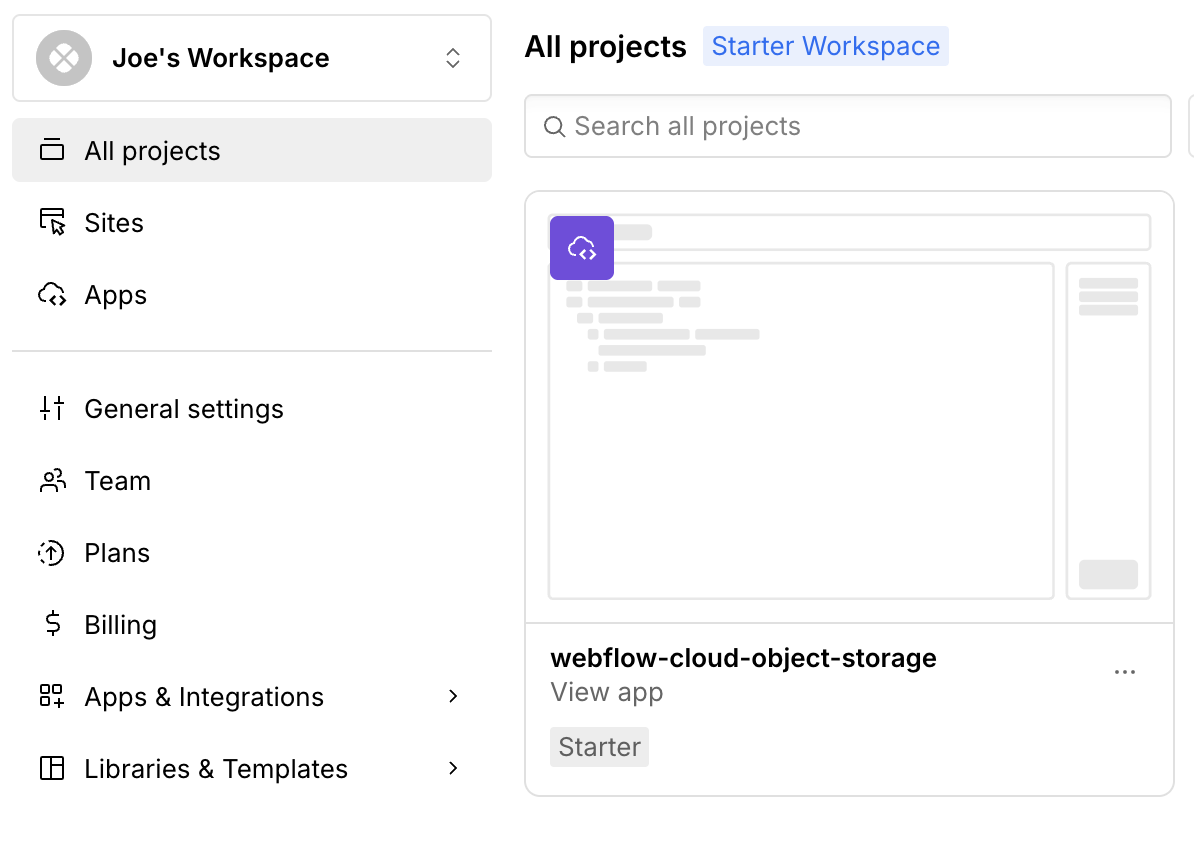
The application also appears as an independent app in your Webflow Workspace:
-
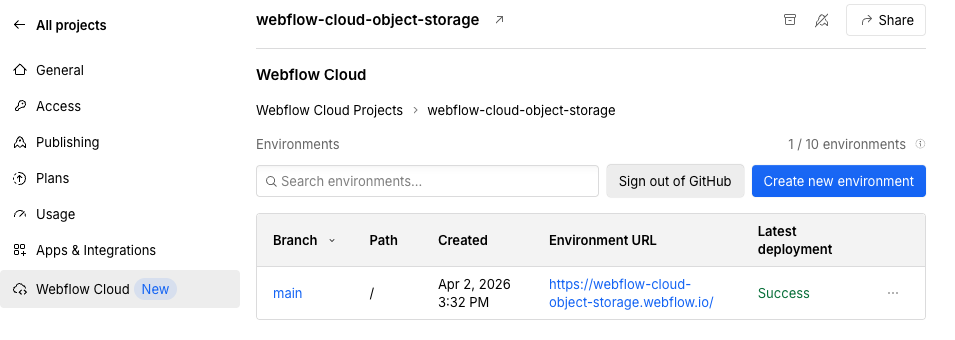
Click Manage app or browse to the app in the Workspace to open its settings. By default, the application is deployed to the root of the domain, as shown in the Environment URL column in this screenshot:
-
Copy the domain of the application because you’ll need it later.
Add Object Storage binding
The app configuration needs a binding to use Object Storage.
This binding tells the app how to connect to the storage resource.
After the binding is declared, the app can use simple methods like .list(), .put(), and .delete() to read from and write to the Object Storage bucket.
Declare a binding in wrangler.json
Open the app’s wrangler.json file and add or update the r2_buckets array to define the Object Storage buckets with the following information:
binding: The variable name to use to access the bucket in your code, which must be a valid JavaScript variable namebucket_name: The name of the bucket to store the files in
Generate type definitions for your binding.
Update the app’s type definitions to enable autocomplete and type safety:
Updating the types ensures that your code editor recognizes the Object Storage binding.
Deploy your app
Commit and push any local changes to the remote GitHub repo. Webflow Cloud automatically redeploys the app.
CLI deployments do not apply changes to binding configurations
To create a binding, you must commit and push your changes to your linked repository.
Access your binding in your Environment Dashboard
- Navigate to the app in your Workspace and open its environments.
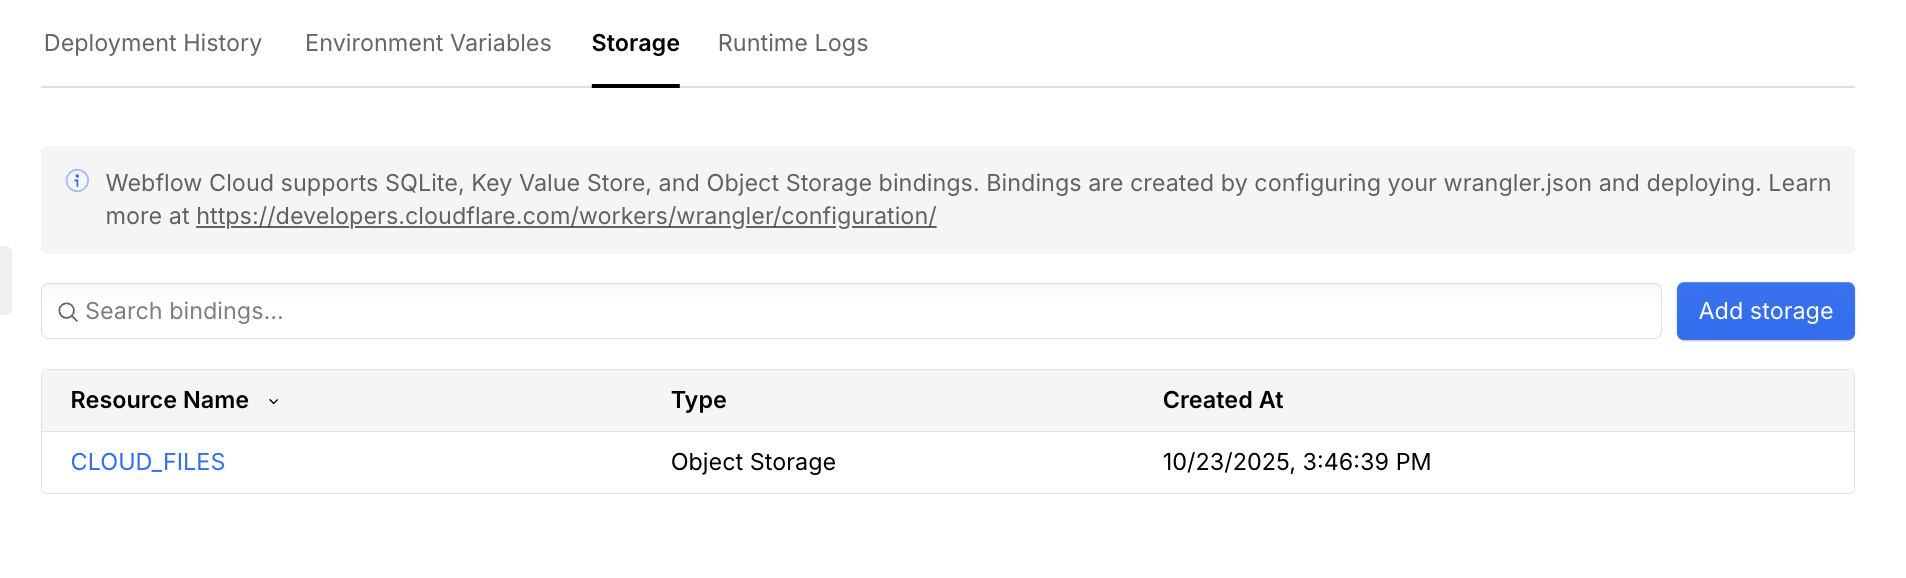
- Select an environment and then click the Storage tab.
This tab appears when the app is deployed and shows the Object Storage binding.
If you deployed the sample application, Webflow Cloud automatically filled in the CLOUD_FILES binding from the app’s wrangler.json file.
Add test files to the bucket
- Click the binding to open it.
- Add some test files by clicking Upload Object
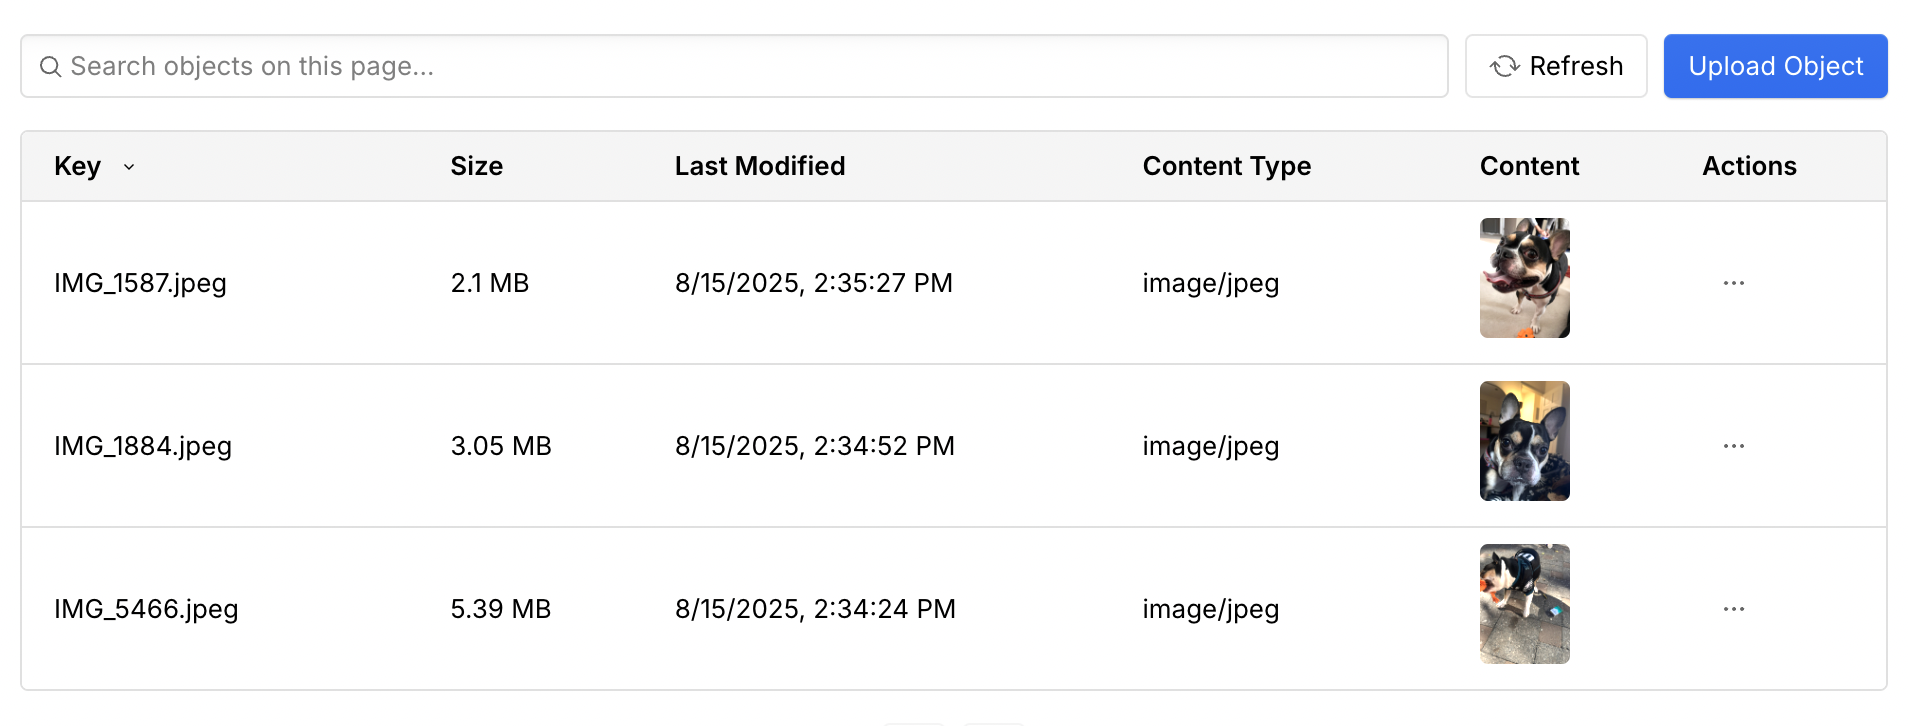
You’ll see the file appear in the bucket in the dashboard.
Uploading files to the local bucket manually
When you run the app locally, you can upload files to a local bucket by running the following command in your terminal:
This command uploads the file to your local bucket, which you can then access when developing the app.
List files in the bucket
To list the files in the bucket in the application, create a route that accesses the bucket’s contents.
This route is provided in the sample application in the file src/pages/api/list-assets.ts.
Create an API directory
In your app’s src/pages directory, create an api directory if the app doesn’t have one already.
Create a list files route
In your api directory, create a new file named list-assets.ts.
This file contains the logic for listing the files in the bucket.
This file is provided in the sample application.
This code creates a GET route that runs these basic steps:
-
Accepts the
localsobject for access to runtime environment variables and bindings. -
Accesses the
CLOUD_FILESbinding. -
Uses the Cloudflare
list()method to get the files in the bucket with pagination support. -
Returns the list of files as a JSON array of
R2Objectitems, each with these properties:key: The file name/pathsize: File size in bytesetag: Entity tag for cachinghttpEtag: HTTP-compatible entity taguploaded: Upload timestampchecksums: File integrity checksumshttpMetadata: HTTP headers and metadata
Serve files from the bucket
Now that the application can list files, create a route to serve individual files from the bucket.
This route handles file requests and returns the file content with appropriate headers.
This route is provided in the sample application in the file src/pages/api/asset.ts.
Create a file serving route
In the api directory, create a file named asset.ts with this code:
This code creates a GET route that runs these basic steps:
- Creates a GET route that returns a single file based on the file key.
Callers pass a
keyquery parameter to specify the file to get and the route returns the file from the bucket via theget()method. - Converts the
R2Objectobject that theget()method returns to a usable format by using the.arrayBuffer()method, which returns the file data as aUint8Arrayobject. - Extracts the content type from the object’s
httpMetadataproperty, with a fallback to an empty string if not available. - Returns the file with the proper
Content-Typeheader.
(Optional) View files in the app
If you added assets to your local bucket in your local app, you can view them now.
To see the app locally, run this command:
This command starts the development server.
You can view the app at http://localhost:4321/YOUR_BASE_PATH.
The files that you added to your bucket should appear in the list of files. If you don’t see the files, verify that your code matches the examples above and that the bucket name is correct.
Deploy the app
To deploy the app to Webflow Cloud, commit and push the changes to your GitHub repository with commands that look like this example:
Go to your environment in Webflow Cloud to see your app deployed.
When it is deployed, you can access the app at https://<YOUR_DOMAIN>/<YOUR_BASE_PATH> and see the files that you uploaded via the Webflow Cloud dashboard.
To upload files from the app, you’ll create a new upload route in the next step.
Upload files to the bucket
The next route that you create uploads files from the application to the bucket. This route processes form data, validates files, and stores them in your bucket.
This approach is best for files less than 1MB. For larger files, see the multipart upload route in the next section.
File uploads should be executed on the domain of your worker
To avoid size upload limits, file upload endpoints should be executed on the domain of your worker using the ASSETS_PREFIX environment variable, not your custom Webflow Cloud domain.
Because of this, you must handle CORS requests for this route.
Create an upload route
In the api directory, open or create the file called upload.ts.
This file contains the logic for uploading files to the bucket:
This code creates a POST route that runs these basic steps:
- Initializes the Astro API utility with the origin set in the environment variables and with handling for CORS preflight requests.
It also handles an
OPTIONSmethod that browsers use to check if the cross-origin request is allowed before sending the actual file data. - Accesses the object storage bucket.
- Extracts the file from the
FormDataobject and verifies that it is a file. - Generates a unique file name for it by combining a timestamp with the file name.
- Uploads the file with the
put()method and sets the content type. - Returns a success response.
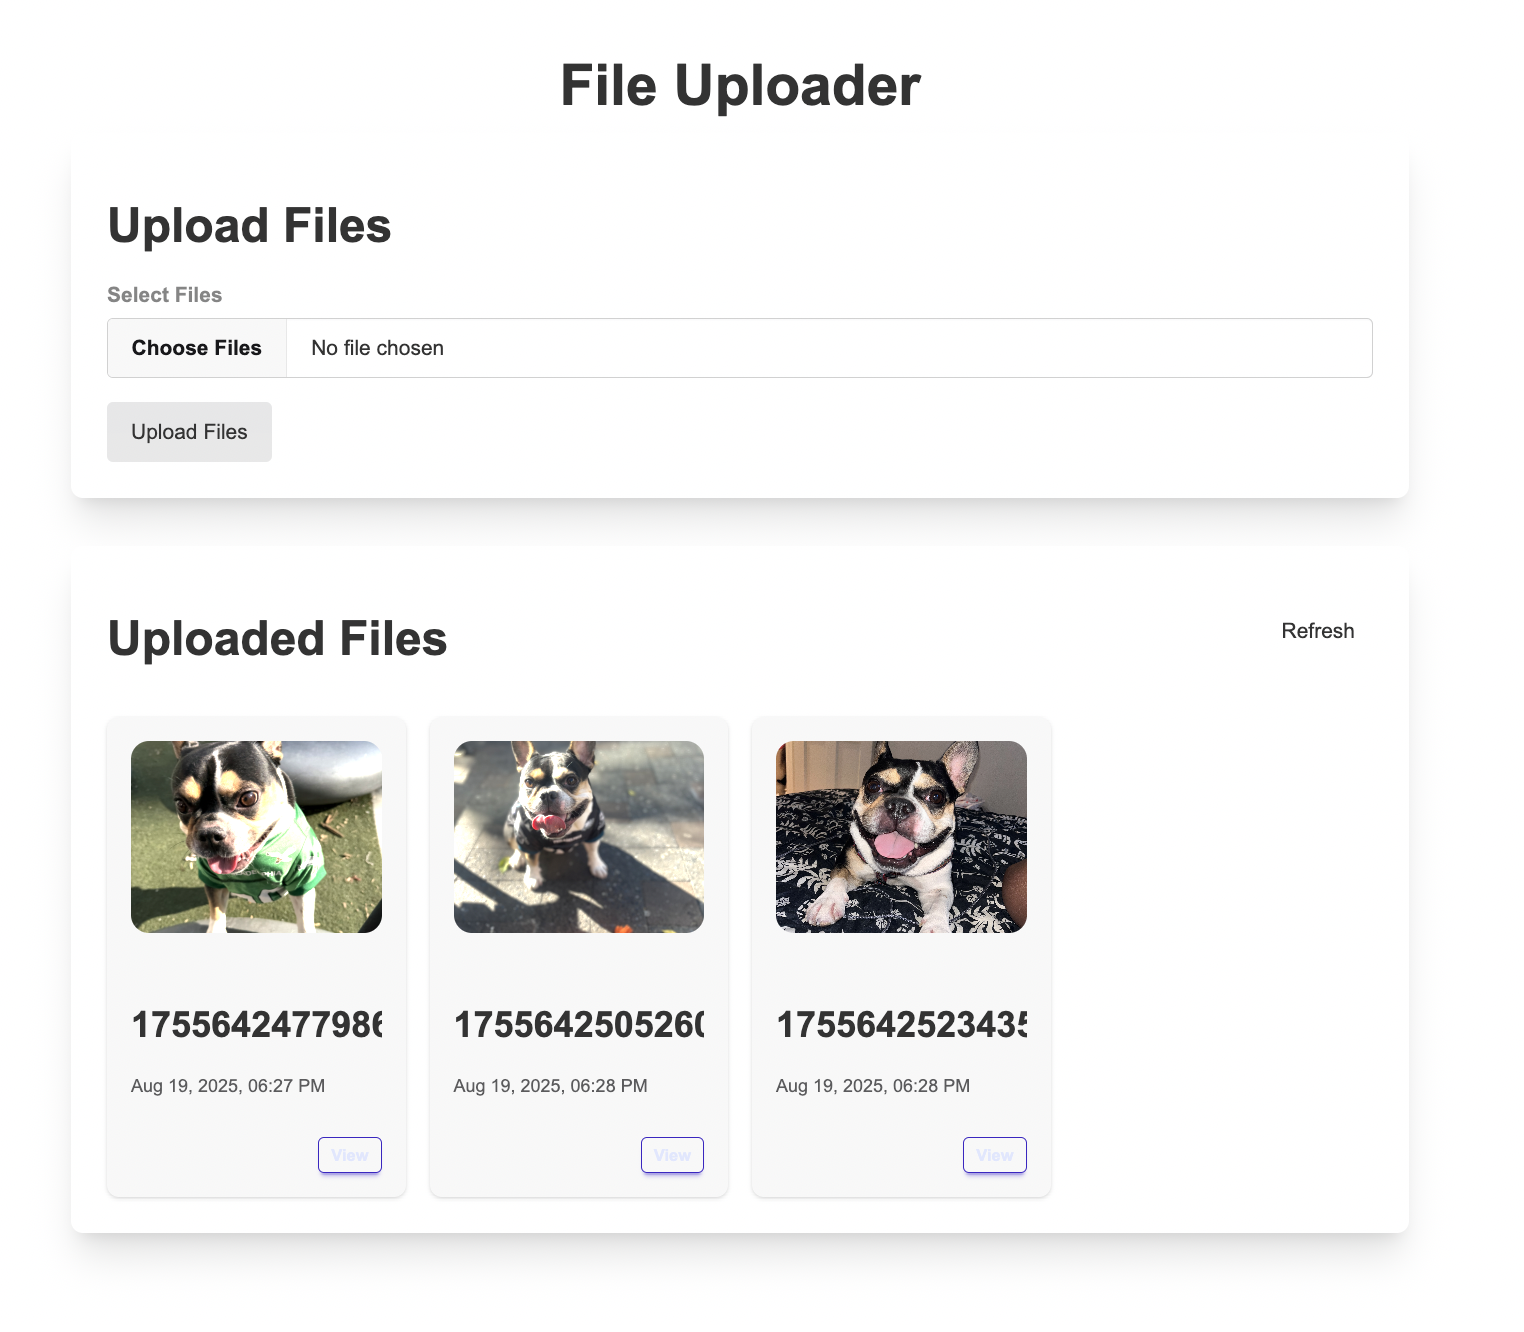
Test the upload route
The frontend is already set up to use the upload route. You can test it by navigating to the file uploader page and uploading a file in your development environment. You should see the file appear in the list of files.
Deploy the app
Deploy the app to Webflow Cloud to start uploading files from the frontend. Commit and push the changes to the GitHub repository to start a deployment:
When your app is deployed, navigate to the file uploader page and upload a file. You should see the file appear in the list of files.
You may see a 413 Content Too Large error if you attempt to upload large files.
For these cases, see the multipart upload route in the next section.
Handle large files with multipart uploads
Webflow Cloud apps have a 100MB request body limit and require requests to complete within 20 seconds. The direct upload approach from the previous section is appropriate for small files. For larger files, use the multipart upload approach shown below.
Multipart uploads break large files into smaller chunks that can be uploaded concurrently, improving upload performance and reliability. This approach allows browsers to upload multiple parts simultaneously and resume interrupted uploads. To allow multipart uploads, you must set up logic on both the server and the browser to handle the multipart upload process.
Create the server endpoints
In a multipart upload, the server-side code handles three main operations:
- Initializes the upload session and gets an upload ID from the bucket
- Uploads individual file chunks
- Combines the parts into the final file and returns the file metadata
This guide covers the creation of the POST and PUT endpoints in the src/pages/api/multipart-upload.ts file to handle these operations:
Create the POST endpoint
In the api directory, create or open the file multipart-upload.ts and add the POST endpoint.
This endpoint handles two action values: create starts a new upload session and returns an uploadId, and complete assembles all uploaded parts into the final file:
This code creates a POST route that runs these basic steps:
- Initializes the API utility with the origin from environment variables and handles CORS preflight
OPTIONSrequests. - Reads the
actionquery parameter to determine whether tocreatea new upload session orcompletean existing one. - For
create: callsbucket.createMultipartUpload()with the file key and optional content type, and returns theuploadIdandkeythat the client uses for subsequent part uploads. - For
complete: callsbucket.resumeMultipartUpload()with the key anduploadIdto get a handle to the existing session, then calls.complete()with the array of uploadedR2UploadedPartitems to assemble the final file, and returns the file metadata.
Create the PUT endpoint
In the same multipart-upload.ts file, add the PUT endpoint.
This endpoint accepts individual file chunks and uploads them to the bucket:
This code creates a PUT route that runs these basic steps:
- Initializes the API utility with the origin from environment variables and handles CORS preflight requests.
- Reads the
uploadId,partNumber, andkeyquery parameters to identify which upload session and part to write. - Calls
bucket.resumeMultipartUpload()to get a handle to the existing upload session. - Reads the request body as an
ArrayBufferand callsmultipartUpload.uploadPart()with the part number and data. - Returns the
partNumberandetagof the uploadedR2UploadedPartitem for the client to track.
The complete file looks like this:
Create the browser logic
The browser handles chunking the file and uploading the parts to the server. To do this, the client-side logic must:
- Get an upload ID from the server
- Send file chunks
- Tell the server to combine the chunks into a file
The example repository already implements this logic. Here is a walkthrough of the code:
Test your multipart upload route
Now that your routes are set up, you can test your multipart upload route by uploading a large file.
Start your development server
Start your development server by running the following command:
Your server should be running at http://localhost:4321/YOUR_BASE_PATH.
Upload a large file
Navigate to the file uploader page and upload a large file. You should see the file appear in the list of files.
FAQs
How do I handle CORS requests for the upload route?
Because upload requests are made directly to the worker domain (not your Webflow Cloud domain), you need to handle CORS properly. Add these headers to your response:
If you’re looking to upload files from an authenticated user with session credentials, you’ll need to generate temporary upload URLs with embedded authentication tokens. Since CORS prevents passing session cookies directly, you can create a secure token that contains user information and embed it in the upload URL.
This approach involves:
- Generating a temporary upload URL with an embedded authentication token
- Validating the token on the upload endpoint
- Using the worker domain for the actual file upload
What's the difference between the BASE_URL and ASSETS_PREFIX environment variables?
What's the difference between the BASE_URL and ASSETS_PREFIX environment variables?
Both the BASE_URL and ASSETS_PREFIX environment variables are automatically set by Webflow Cloud to help with routing logic in your app. You can access these variables as you would any other environment variable in your app.
BASE_URLis automatically set to the mount path of your environment (for example,/app). This is useful for setting up redirects and other routing logic in your app.ASSETS_PREFIXis set to the domain of the Worker your app is deployed to (for example,https://YOUR_ENV_HASH.wf-app-prod.cosmic.webflow.services). This link is essential for uploading large files to your bucket, and serving files directly from your app. Because this link will always be a different domain than your app’s domain, you’ll need to handle CORS requests for the upload route.
Learn more about built in environment variables in Webflow Cloud.
Can I create presigned URLs to upload directly to my bucket?
No, presigned URLs require credentials that aren’t available in Webflow Cloud’s secure environment. Instead, use the multipart upload endpoints to upload files through your app’s API routes.
Can I expose a public bucket to the web?
No, public buckets aren’t supported in Webflow Cloud. All bucket access must go through your app’s API routes, which gives you control over access permissions and allows you to implement proper authentication and authorization.
Why do I get a 413 Content Too Large error when uploading to my bucket?
Likely the file being uploaded is hitting current Webflow Cloud request limits. You should upload these larger files through the multipart upload strategy.