

Delta Lake
This guide walks you through configuring Delta Lake as a destination for your Webflow Analyze and Optimize data export.
Delta Lake can be set up on AWS S3, Google Cloud Storage, or Azure. Select your cloud provider below.
Setting up AWS S3 Delta Lake
Prerequisites
- By default, S3 authentication uses role-based access. You will need the trust policy prepopulated with Webflow’s identifier to grant access.
Configuration steps
Set up destination S3 bucket
Create bucket
- Navigate to the S3 service page.
- Click Create bucket.
- Enter a Bucket name and modify any of the default settings as desired. Note: Object Ownership can be set to “ACLs disabled” and Block Public Access settings for this bucket can be set to “Block all public access” as recommended by AWS. Make note of the Bucket name and AWS Region.
- Click Create bucket.
Create policy and IAM role
Create policy
-
Navigate to the IAM service page.
-
Navigate to the Policies navigation tab, and click Create policy.
-
Click the JSON tab, and paste the following policy, being sure to replace
BUCKET_NAMEwith the name of the bucket chosen in Step 1. -
Click Next: Tags, click Next: Review.
-
Name the policy, add a description, and click Create policy.
Create role
-
Navigate to the IAM service page.
-
Navigate to the Roles navigation tab, and click Create role.
-
Select Custom trust policy and paste the provided trust policy to allow AssumeRole access to the new role. Click Next.
-
Add the permissions policy created above, and click Next.
-
Enter a Role name, for example,
transfer-role, and click Create role. -
Once successfully created, search for the created role in the Roles list, click the role name, and make a note of the ARN value.
Alternative authentication method: AWS User with HMAC Access Key ID & Secret Access Key
Role-based authentication is the preferred authentication mode for S3 based on AWS recommendations. However, HMAC Access Key ID & Secret Access Key is an alternative authentication method that can be used if preferred.
- Navigate to the IAM service page.
- Navigate to the Users navigation tab, and click Add users.
- Enter a User name for the service, for example,
transfer-service, click Next. Under Select AWS access type, select the Access key - Programmatic access option. Click Next: Permissions. - Click the Attach existing policies directly option, and search for the name of the policy created in the previous step. Select the policy, and click Next: Tags.
- Click Next: Review and click Create user.
- In the Success screen, record the Access key ID and the Secret access key.
Add your destination
Use the following details to complete the connection setup: bucket name, bucket region, and role ARN.
- Instructions for Analyze / Optimize for Webflow sites
- Instructions for Optimize for non-Webflow sites
Setting up Google Cloud Delta Lake
Prerequisites
- By default, GCS authentication uses role-based access. You will need the Webflow Data Sync Service Account email to grant access:
datasync-webflow@prql-prod.iam.gserviceaccount.com.
Configuration steps
Create a service account
-
In the GCP console, navigate to the IAM & Admin menu, click into the Service Accounts tab, and click Create service account at the top of the menu.
-
In the first step, name the service account that will be used to transfer data into Cloud Storage and click Create and Continue. Click Continue in the following optional step without assigning any roles.
-
In the Grant users access to this service account step, within the Service account users role field, enter the provided Service account (see prerequisite) and click Done.
-
Once successfully created, search for the created service account in the service accounts list, click the Service account name to view the details, and make a note of the email (note: this is a different email the Webflow Data Sync Service Account).
-
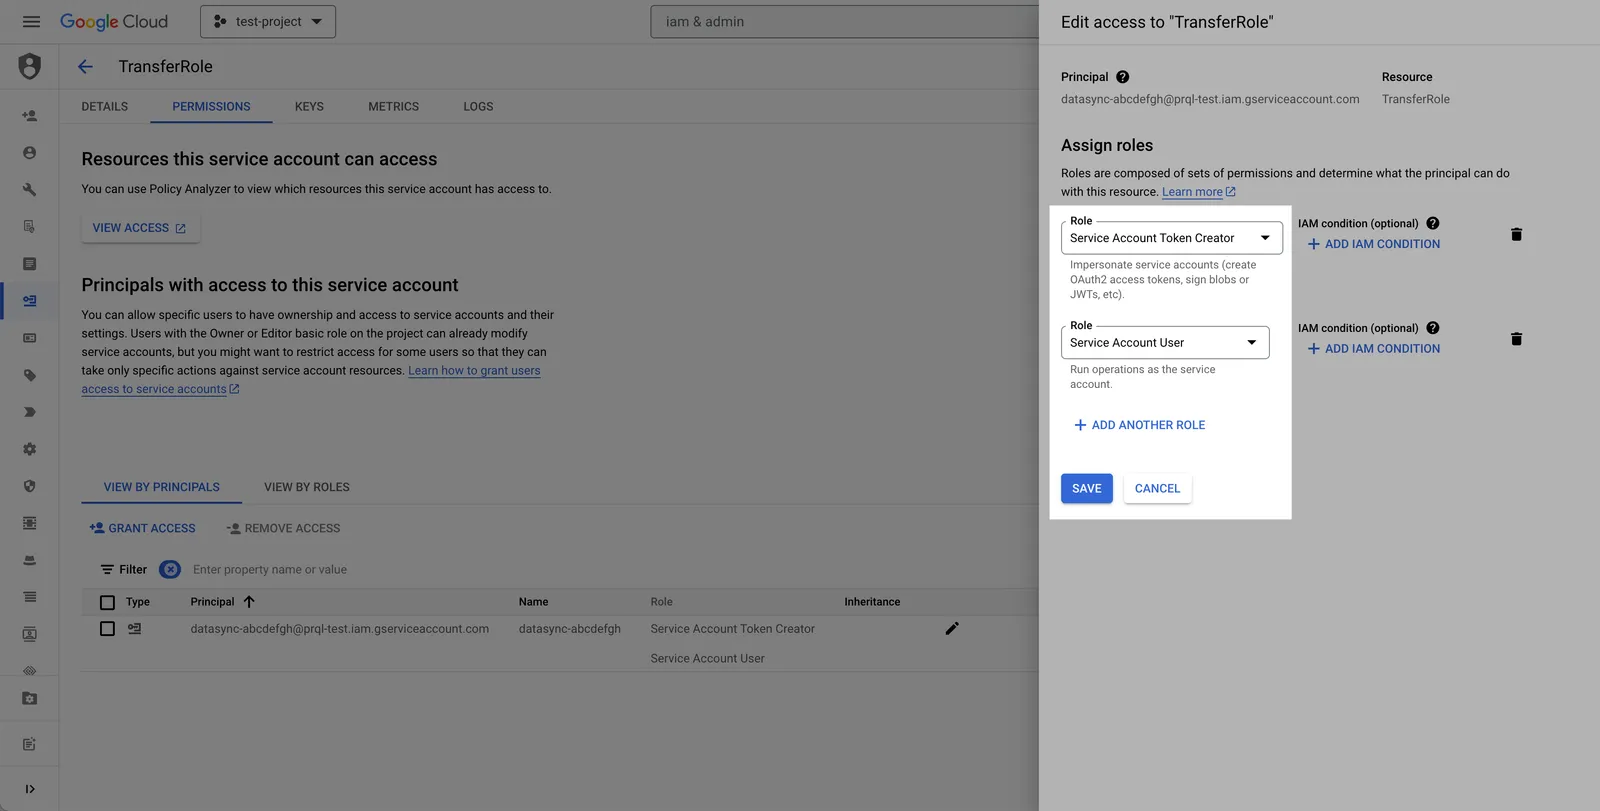
Select the permissions tab, find the provided principal name (Service account from the prerequisite), click the Edit principal button (pencil icon), click Add another role, select the Service Account Token Creator role, and click Save.
Alternative authentication method: Granting direct access to service account
Role-based authentication is the preferred authentication mode for GCS based on GCP recommendations. However, providing a service account key to directly log in to the created service account is an alternative authentication method that can be used if preferred.
-
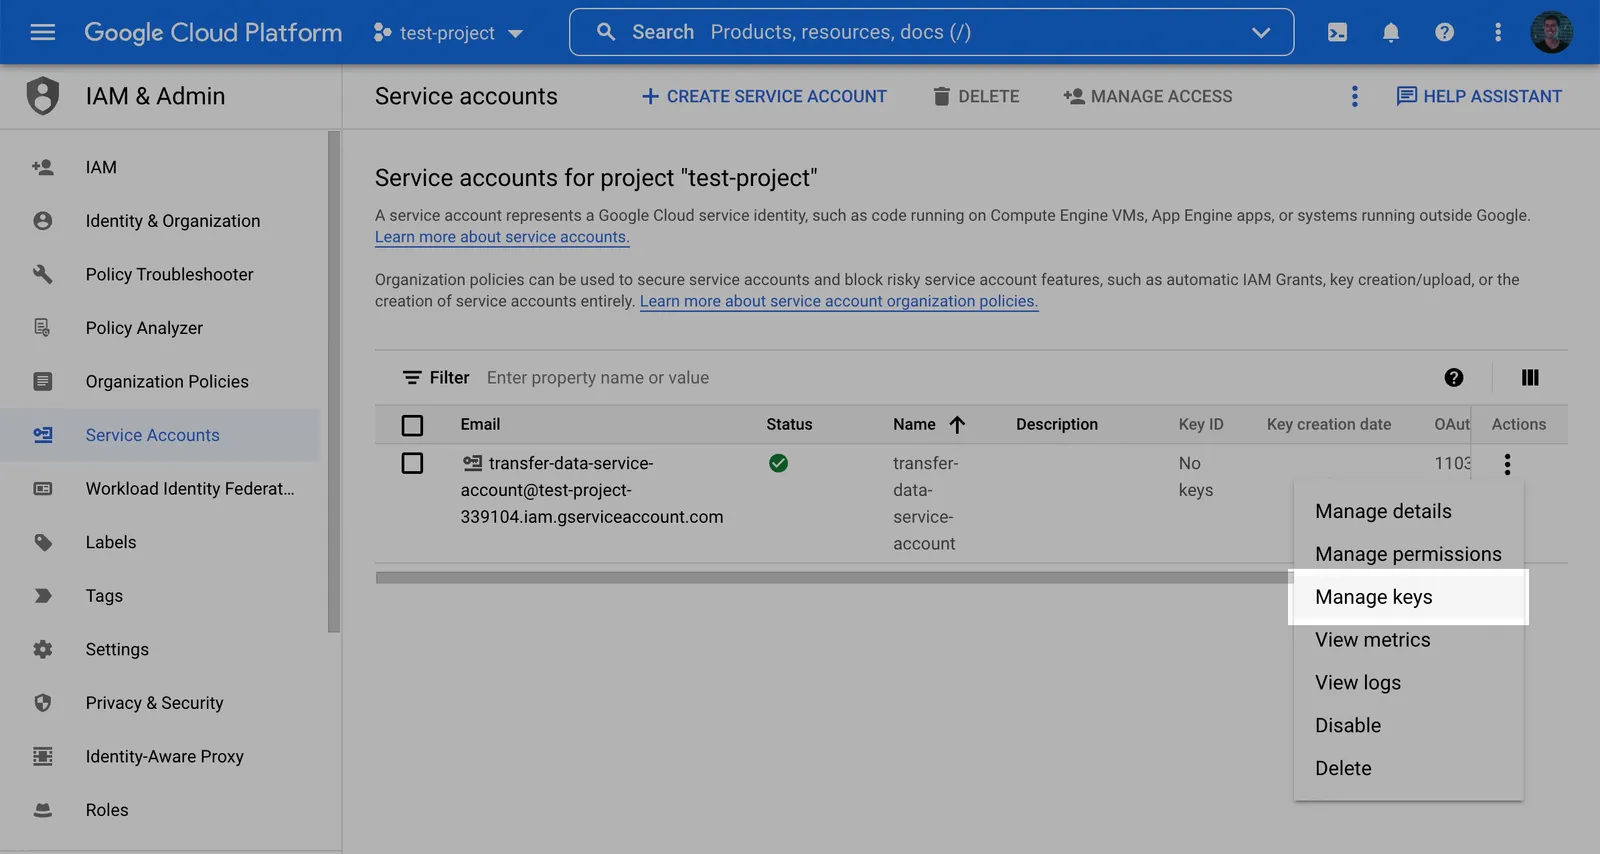
Back in the Service accounts menu, click the Actions dropdown next to the newly created service account and click Manage keys.
-
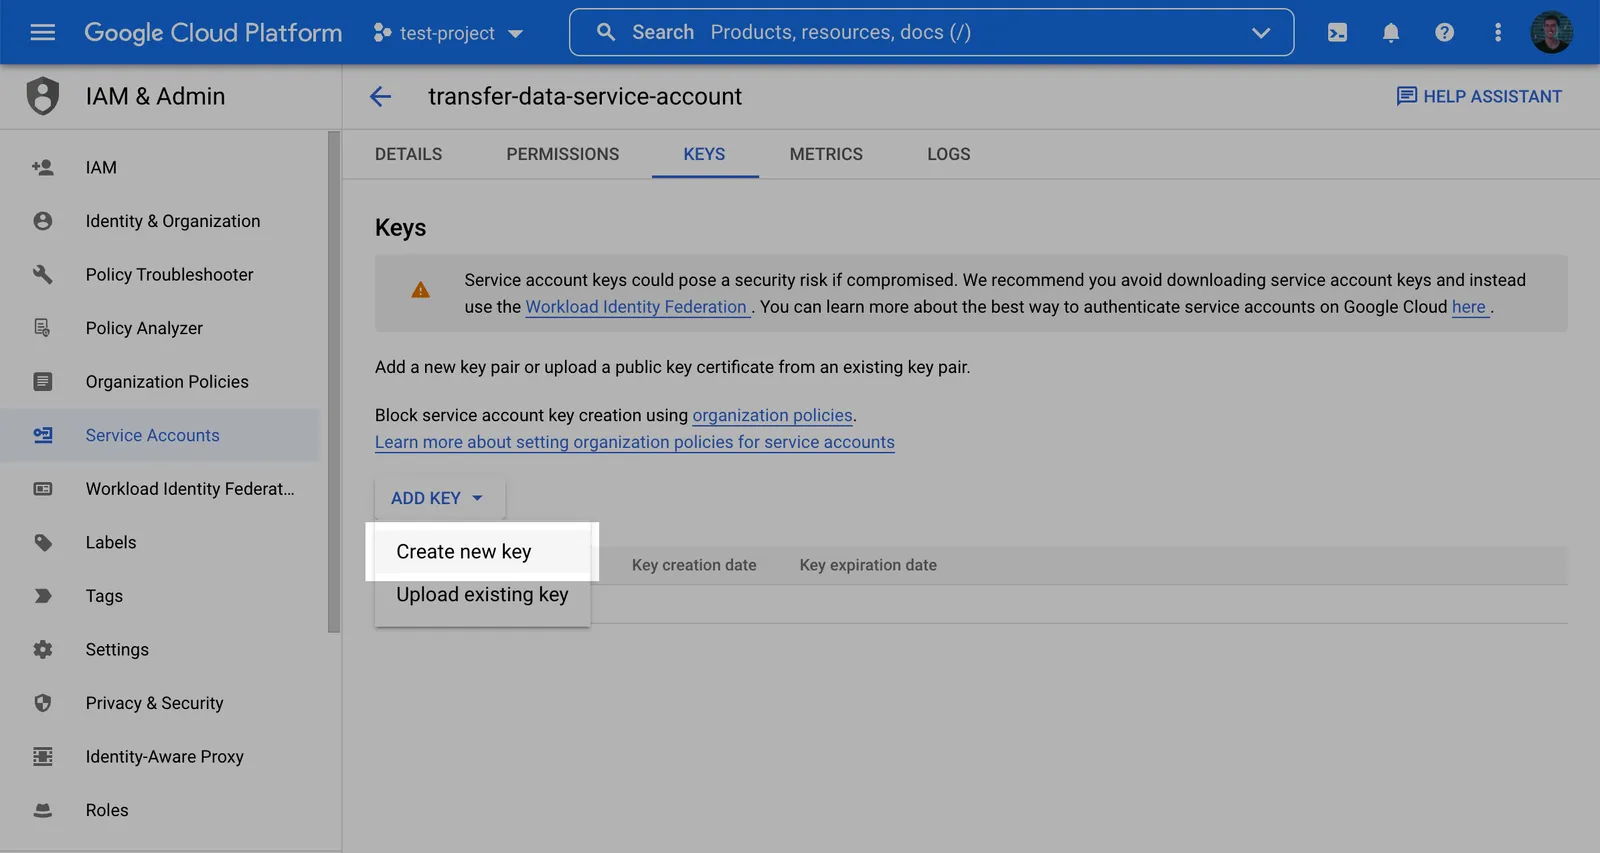
Click Add key and then Create new key.
-
Select the JSON Key type and click Create and make note of the key that is generated.
-
Create destination GCS bucket
-
Navigate to the Cloud Storage page.
-
Click Create.
-
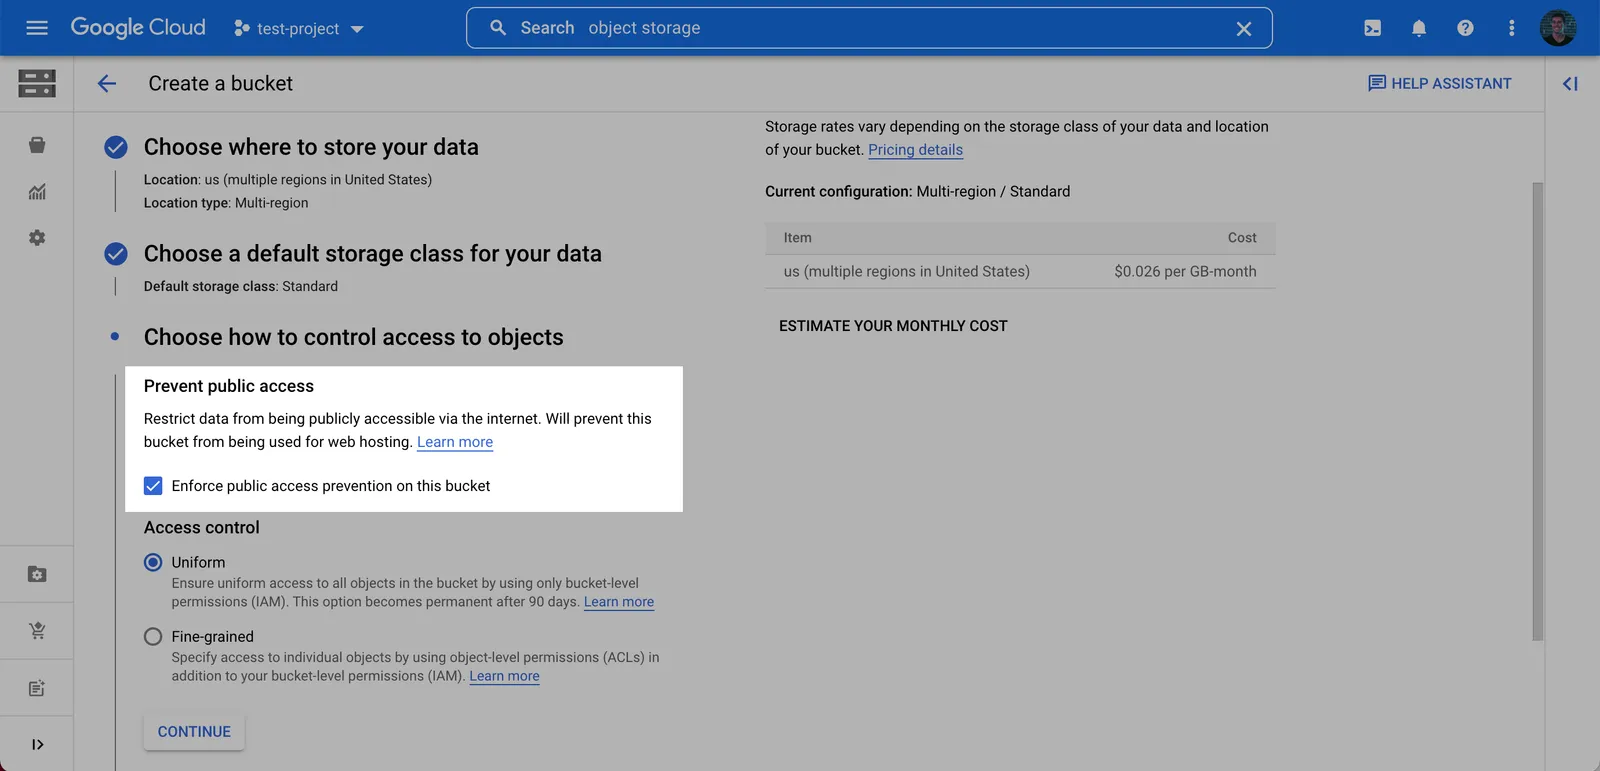
Enter a bucket name, choose a region. Note: at the Choose how to control access to objects step, we recommend selecting Enforce public access prevention on this bucket.
-
After choosing your preferences for the remaining steps, click Create.
-
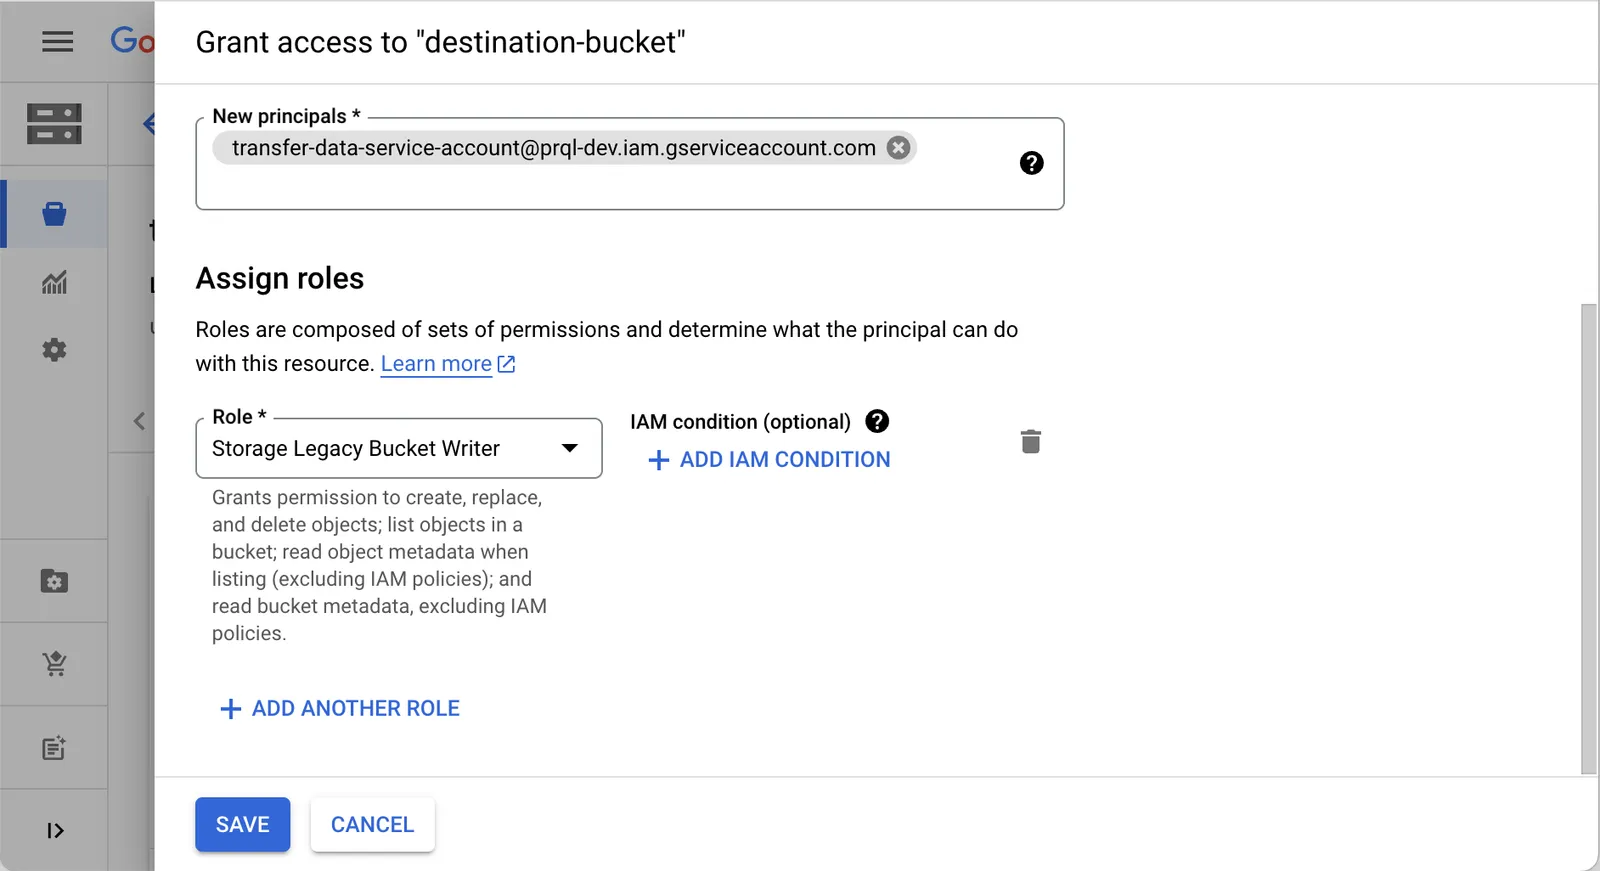
On the Bucket details page for the bucket you created, select the Permissions tab, and click Grant access.
-
Grant access to the principal (Service Account) you created in Step 1 (Note: this is the service account you created, not the service account from the prerequisite), and assign the Roles: Storage Legacy Bucket Writer, Storage Legacy Bucket Reader, Storage Legacy Object Reader. Click Save.
Add your destination
Use the following details to complete the connection setup: bucket name, your chosen folder name for the data, and your Service account email.
- Instructions for Analyze / Optimize for Webflow sites
- Instructions for Optimize for non-Webflow sites
Setting up Azure Delta Lake
Configuration steps
Create Azure storage account
-
In the Azure portal, navigate to the Storage accounts service and click + Create.
-
In the “Basics” tab of the “Create a storage account” form, fill in the required details.
-
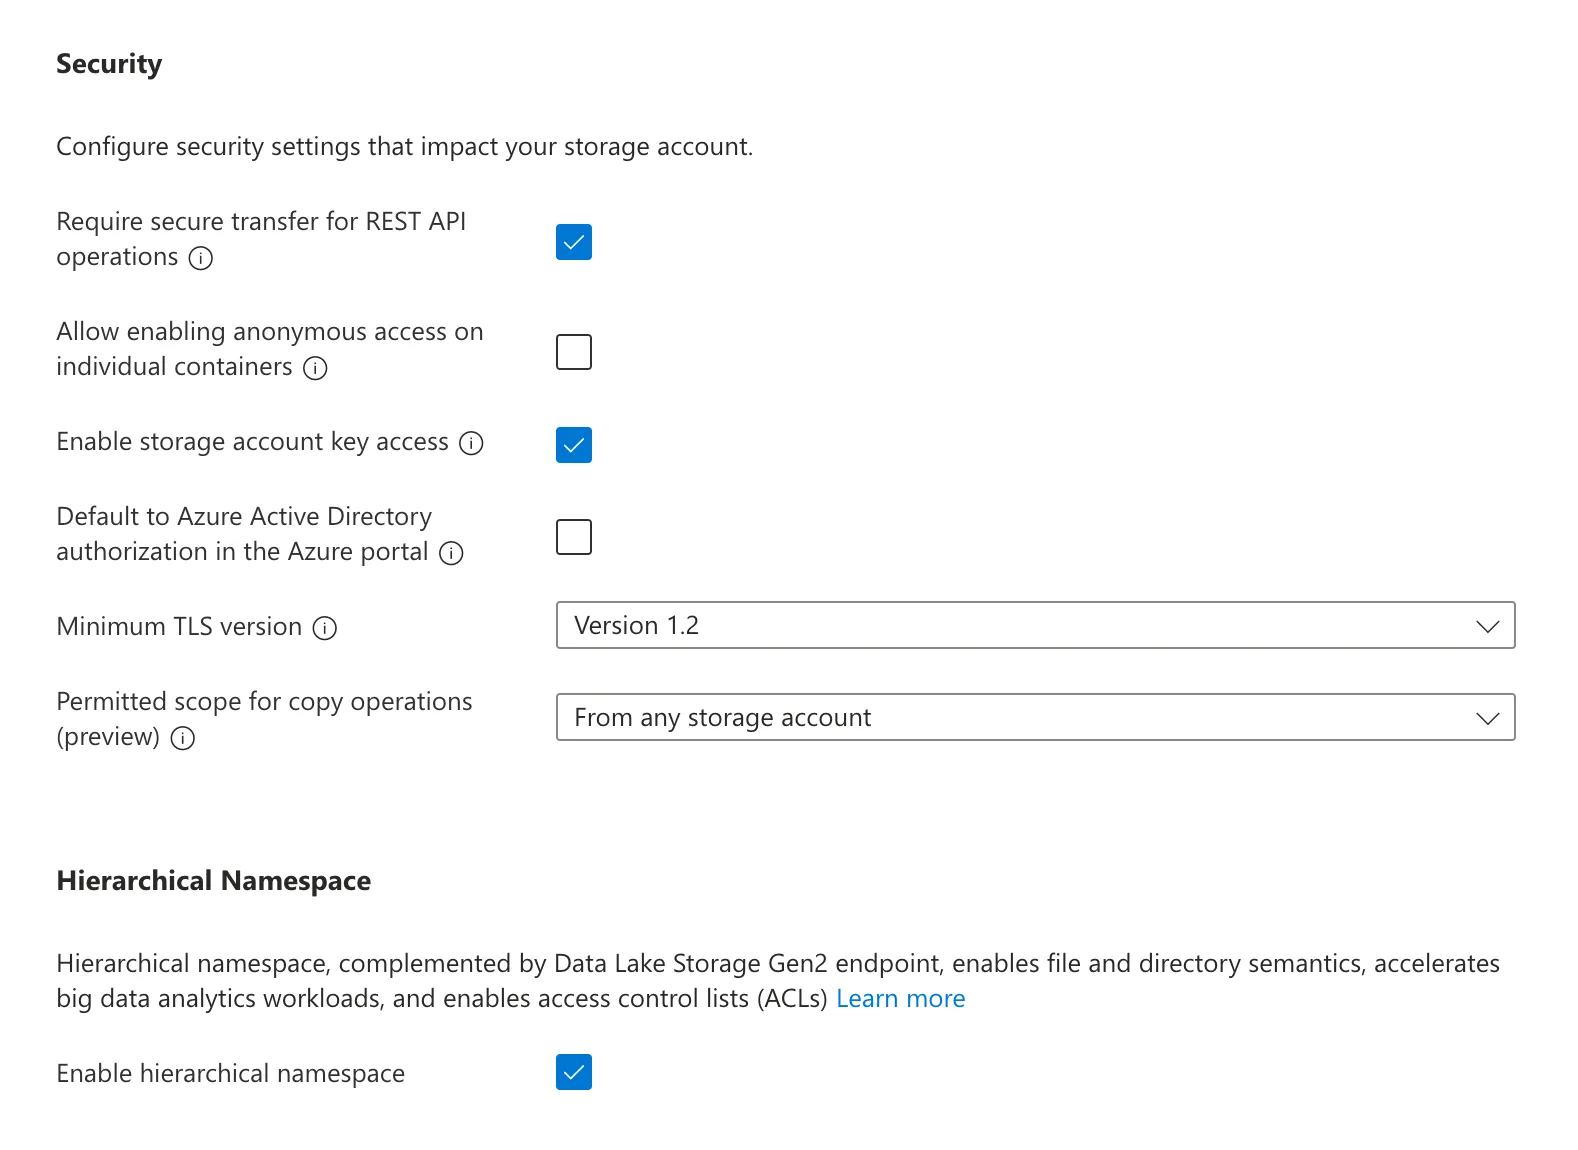
In the “Advanced” settings, under “Security” make sure Enable storage account key access is turned on. You may turn off (deselect) “Allow enabling public access on containers”. Under “Data Lake Storage Gen2”, select Enable hierarchical namespace.
-
In the “Networking” settings, you may limit “Network access” to either Enable public access from all networks or Enable public access from selected virtual networks and IP addresses. If the latter is selected, be sure to add Webflow’s static IP to the address range of the chosen virtual network. All other settings can use the default selections.
-
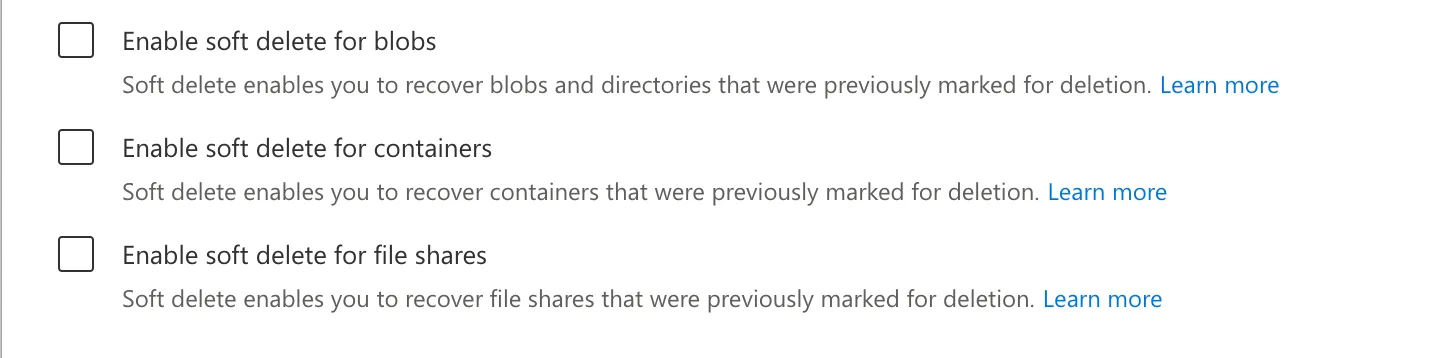
In the “Data protection” settings, you must turn off Enable soft delete for blobs, Enable soft delete for containers, and Enable soft delete for file shares.
-
Once the remaining options have been configured to your preference, click Create.
Create container and access token
- In the Azure portal, navigate to the Storage accounts service and click on the account that was created in the previous step.
- In the navigation pane, under “Data storage”, click Containers. Click + Container, choose a name for the container, and click Create.
- In the navigation pane, under “Security + networking”, click Access keys.
- Make a note of the Key that is generated for either key1 or key2.
Add your destination
Use the following details to complete the connection setup: storage account name, container name, your chosen folder name for the data, and your Access key.
- Instructions for Analyze / Optimize for Webflow sites
- Instructions for Optimize for non-Webflow sites
Understanding Delta Lake configuration options
Changing these attributes on an existing destination table will not take effect until you perform a full refresh of the table.
Protocol compatibility summary
The table below outlines the recommended settings for each feature to qualify for a given protocol minimum reader version. Adjust your configuration to match the protocol version required by your downstream readers.
For more details on protocol compatibility, please refer to the Delta Feature Compatibility documentation.
There are four key Delta Lake table properties that affect both performance and protocol compatibility. Adjust these settings carefully based on your performance needs and the protocol version supported by your readers.
retention_window_days
Purpose: Sets the number of days for which historical data (e.g., previous table versions used for time travel or auditing) is retained.
Recommendation: Set this value according to your organization’s internal data retention policies.
column_mapping_mode
Purpose: Controls how columns are mapped between the underlying storage and the table schema. This setting is critical during schema evolution.
Recommendation: Set this to ID for robust, identifier-based mapping. Use a different setting (such as NONE or NAME) only if you need to support a lower protocol reader version.
deletion_vectors_disabled
Purpose: Determines whether deletion vectors are used.
- Deletion Vectors enable the merge-on-read approach, where modifications (like deletes) are applied by marking rows as deleted without rewriting the underlying Parquet files.
- The traditional copy-on-write approach rewrites entire files for each change, which can be slower for small modifications.
Recommendation:
- Enable deletion vectors (i.e., set
deletion_vectors_disabledto false) to leverage merge-on-read performance benefits. - Disable deletion vectors if you must support a lower minimum reader version.
change_data_feed_disabled
Purpose: Controls whether the change data feed (CDF) is active. The CDF records row-level changes (inserts, updates, and deletes) for incremental processing, auditing, or real-time analytics.
Recommendation:
- Keep change data feed enabled (i.e., set
change_data_feed_disabledto false) by default. - Disable change data feed only if you need to support a lower minimum reader version.
FAQs
What is Delta Lake and why should I use it?
Delta Lake delivers warehouse-native capabilities such as upserts, time travel, and schema evolution—with the simplicity, scalability, and secure permissions model of an object storage bucket. It gives you the advanced transactional features and data consistency of a data warehouse while eliminating extra compute costs and provisioning required to write directly to a warehouse. This enables your warehouse to be isolated from data sharing, so you can receive data without exposing your internal resources.
Why do you need permissions to delete data?
Delta Lake uses vacuum operations to clean up obsolete data files and maintain transaction isolation. The writer must have delete permissions so that vacuuming can safely remove outdated files without compromising the consistency and isolation of ongoing transactions.
Can I send the data to a specific prefix in a bucket?
Yes, you can direct data to a specific prefix. However, we recommend using a completely isolated bucket to receive data. The Delta Lake destination requires permissions to list objects in the entire bucket, meaning all permissions cannot be scoped to a specific prefix. Isolating the destination to a dedicated bucket minimizes security risks and reduces the chance of malformed data mixing with other datasets.
Do I need to perform maintenance operations on the Delta Lake table?
No, the data writer is responsible for vacuuming and compacting data as needed. Data consumers should not run any non read queries on the table.
How do I know when a table has been updated?
To check for updates, you can query the table history. In Spark or Databricks SQL, run:
This command returns the most recent commit details. Additionally, most bucket providers offer the capability to trigger a webhook or lambda when objects are created. Configure the trigger to execute whenever a file is created in s3://bucket-name/<configured_path>/<table_name>/_delta_log to know when a table has been updated.
What is the difference between merge-on-read and copy-on-write in Delta Lake?
- Merge-on-Read: Uses deletion vectors to mark rows as deleted or modified without rewriting entire files. This approach speeds up incremental updates by applying changes during read time.
- Copy-on-Write: Rewrites entire Parquet files upon any modification, which can be less efficient for small or frequent changes.
Mounting Delta Lake to analytics platforms
Mounting AWS S3 Delta Lake to Athena
Protocol MinReader Version: Athena requires delta lake tables compatible with Protocol MinReader Version 1.
-
In the AWS console, navigate to the Athena query editor.
-
Choose the same region as your configured bucket.
-
Execute the following SQL:
Mounting GCS Delta Lake to BigQuery
Protocol MinReader Version: BigQuery requires delta lake tables compatible with Protocol MinReader Version 3.
- In the Google Cloud console, navigate to the BigQuery Console.
- Click the + Add Data button at the top left of the console.
- Select Google Cloud Storage as a Data Source.
- Select GCS: (Manual) BigLake External & External Tables: BigQuery option.
- Set the file format to Delta, then provide the path expression
'<bucket-name>/<configured_path>/<table_name>'. - Choose a Dataset in the same region as the bucket and a table name.
- Choose Table Type External Table.
- Create your external table and query data to test.
Schema Evolution: The external table must be manually refreshed anytime new columns are added. Consult GCP documentation for instructions.
Mounting AWS S3 Delta Lake to ClickHouse
Managed Credentials: Clickhouse supports managed credentials so that access key or role information does not need to be included in the CREATE TABLE... syntax.
-
Open a Clickhouse SQL session.
-
Execute the following SQL:
Mounting AWS S3 Delta Lake to DuckDB/MotherDuck
Column Mapping: DuckDB requires delta lake tables use column mapping mode NONE.
Secrets Manager: DuckDB has a secrets manager which can be used in order for the access key or role information to not need to be included in the CREATE TABLE... syntax.
-
Install the DuckDB Delta extension.
-
Open a DuckDB SQL session.
-
Execute the following SQL:
Mounting S3 Delta Lake to Databricks (Unity)
-
Ensure your Databricks session has read access to the configured bucket.
-
Open a Databricks SQL session.
-
Execute the following SQL:
Mounting S3 Delta Lake to Redshift
Protocol MinReader Version: Redshift requires delta lake tables compatible with Protocol MinReader Version 1.
- On the AWS Glue console, choose Crawlers in the navigation pane.
- Choose Create crawler.
- For Name, enter a name and choose “Next”.
- For Data source configuration, choose “Not yet”.
- For Data source, choose Add a data source.
- For Data source, select Delta Lake.
- For Include delta lake table paths, enter
s3://bucket-name/<configured_path>/<table_name>. - Select Enable write manifest, then choose Add a Delta Lake data source. Choose Next.
- For IAM role, either select an existing role or create one with permissions to Glue and the bucket.
- For Target database, choose Add database, then Create a database page is shown.
- For Name, enter a name, then choose Create database. Then come back to the previous page. For Target database, click the reload button, and select the created database.
- For Frequency under Crawler schedule, choose double the frequency data is delivered. For example for data arriving on hourly minute frequency, choose 30 minutes.
- Review your configuration, and choose Create crawler. You can trigger the crawler to run manually via the AWS Glue console, or through the SDK or AWS CLI using the StartCrawl API. You could also schedule a trigger via the AWS Glue console.
- Wait for the crawler to complete.
- Navigate to Redshift and inspect the awsdatacatalog to find the newly created table.
Reading S3 Delta Lake with PySpark
Broad Compatibility: Spark can consume Delta Lake tables from S3, Google Cloud Storage, Azure Blob Storage, or other S3 compatible object stores. Delta Lake reads can be done in Java, Python, or Scala Spark.
In your PySpark code, run the following to instantiate a dataframe backed by your delta table:
Mounting S3 Delta Lake to Snowflake
Protocol MinReader Version: Snowflake requires delta lake tables compatible with Protocol MinReader Version 2.
-
Open a Snowflake client.
-
Execute the following SQL, choose your frequency based on desired data freshness:
Mounting Delta Lake to Microsoft Fabric & Microsoft OneLake
Column Mapping: Requires delta lake tables use column mapping mode NONE.
-
Navigate to Microsoft Fabric.
-
Navigate to your lakehouse, if you do not have one, create one.
-
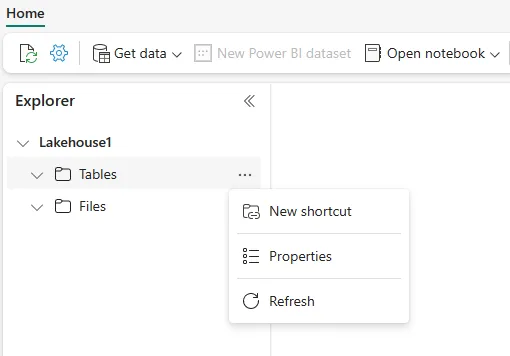
In your lakehouse, select the ellipses (…) next to Tables and then select “New shortcut”.
-
In the New shortcut screen, select your bucket provider. Normally this will be Azure Data Lake Storage Gen2 tile.
-
Connect to your bucket and select the path of the delta lake table
'<configured_path>'/<table_name>'.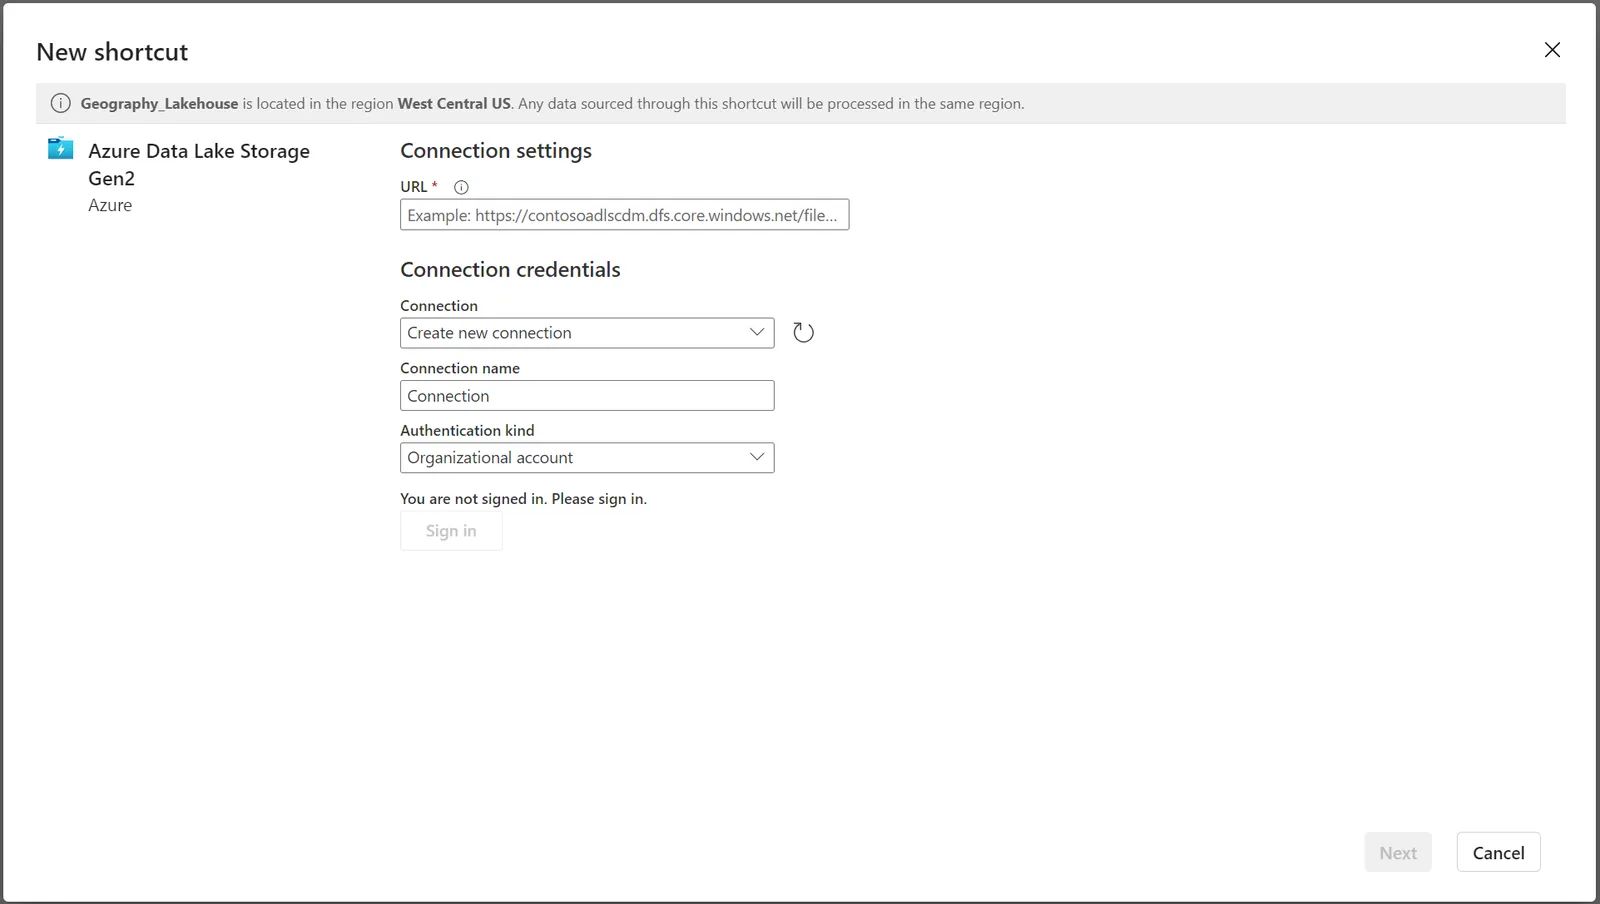
-
After creating the shortcut, the shortcut should appear as a Delta table under Tables. It may appear as “Unidentified”, this is a UI bug in Azure.
-
To confirm the table is correctly mounted, select “SQL Analytics endpoint” from the drop down to the left of the “share” button, in the top right of the console.
-
The shortcut should correctly appear as a Delta table under Tables.
-
(Optional) Click the “New semantic model” button at the top of the page to setup the mounted table for use in Microsoft products like PowerBI.
Vector Support: Azure Fabric and Microsoft OneLake do not support Delta Lake vector columns. These columns will be omitted from any table you mount.